You can create a website in 8 steps and in under 20 minutes—even if you’ve never built one before. With modern hosts and visual editors, the setup is faster than ever.
Whether it’s for business, a personal blog, a portfolio, or an online store, you don’t need a designer or developer to get started. Just follow the steps below and your website will be live before you know it—and ready to grow.
If your goal is to grow an audience, build a brand, or make money online, there’s a bit more to do—but don’t stress. Everything is laid out step-by-step in the guide below, including quick wins for speed, SEO, and security.
8 Steps to Create a Website
Here’s a high-level look at what’s ahead. You can use these links to skip ahead to the section you need, or follow them in order to build your site from scratch.
- Choose the perfect domain
- Get web hosting and free domain registration with Hostinger
- Claim your free domain with Hostinger
- Install WordPress with Hostinger
- Design your website with a customizable theme
- Build your website’s architecture
- Connect your web pages with menus
- Launch essentials: SSL, SEO basics, and speed
Step 1: Choose the Perfect Domain
Your domain name is one of the most important choices you’ll make. It’s how people find you online and what they’ll type into their browser to reach your site. It’s also one of the first impressions visitors will have of your brand.
While many popular domain names are already taken, there are still tons of creative and brandable options available if you follow a smart strategy.
Here’s what to consider when brainstorming your domain:
- Make it easy to say and spell. People should be able to repeat your domain without confusion.
- Keep it short. Aim for fewer than 14 characters so it’s easy to remember and type.
- Favor familiar extensions.
.comis still king, but.organd.netare solid too. Niche TLDs (.store,.tech,.io) can work when they fit your brand. - Use your name if personal branding matters. Great for blogs, portfolios, or influencer sites.
- Avoid numbers and hyphens. They make your domain look messy and harder to share out loud.
Also check that matching social handles are available and that you’re not infringing on trademarks. Consistency across your domain and social profiles makes brand-building easier.
Always brainstorm a few backup ideas in case your first choice isn’t available. Hostinger’s free domain search tool makes this fast and easy.
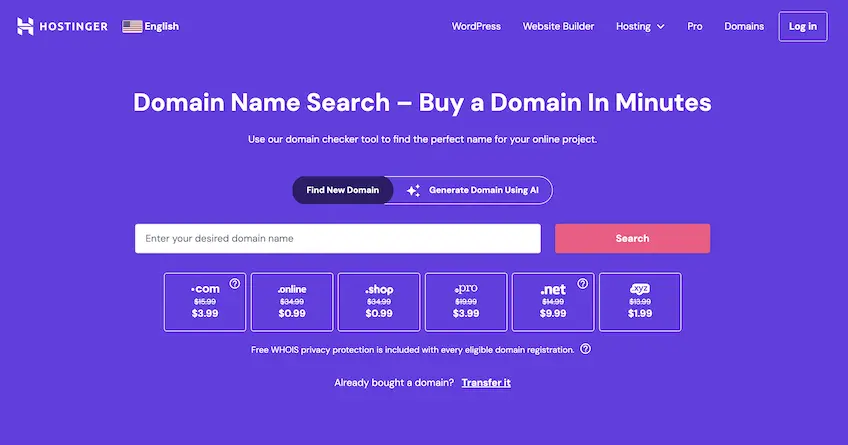
Type your top domain choice into the search bar. If it’s available, great! If not, Hostinger will suggest similar names you might like.
Sometimes you’ll need to tweak your idea or explore variations to find something perfect. That’s totally normal. Don’t rush the process.
I recommend sticking with available domains rather than trying to buy one that’s already owned. Purchasing existing domains can easily cost thousands—or even six figures.
Pro tip: Don’t add the domain to your cart just yet. You’ll get it for free when you sign up for Hostinger’s Premium plan (or higher) with an annual or longer term, which I cover next.
I’ll walk through that process now.
Step 2: Get Web Hosting and Free Domain Registration With Hostinger
To make your site live on the internet, you need two things: a domain name and a web hosting service.
Since you already have a domain name in mind, the next step is finding a reliable web host to store your website files and deliver them to your visitors.
My top recommendation is Hostinger. It’s fast, beginner-friendly, and affordable. Plus, they include a free domain name on eligible TLDs when you sign up for at least 12 months.
Use my link to sign up with Hostinger at their introductory rate. That gives you everything you need to launch your website today.
Once on Hostinger’s homepage, go to the Hosting menu and choose Web Hosting.
You’ll see beginner-friendly options like Premium, Business, and Cloud Startup.
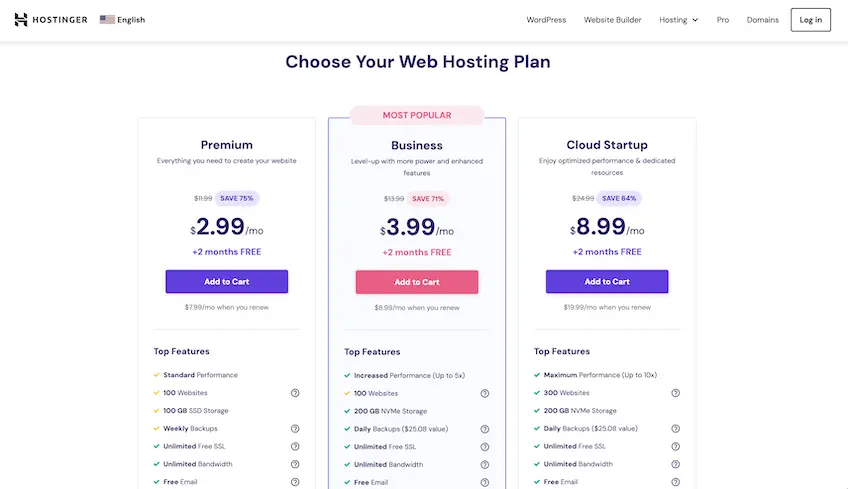
The Premium plan is ideal for beginners and comes with essentials like free SSL, email, and ample storage. If you’re planning to run an online store or expect higher traffic, go with Business or Cloud Startup for more CPU/RAM, staging tools, and daily backups.
You can always upgrade later as your site grows. Starting with Premium keeps things simple and affordable.
It’s one of the best values around. Other hosts charge extra for must-have features like SSL certificates and website builders—but Hostinger includes them at no extra cost.
Next, you’ll complete the sign-up and payment process. Here’s what to expect:
- Create your Hostinger account. Use a valid email address you check often. This is how they’ll send account info and alerts.
- Enter payment details. Hostinger supports major cards and popular digital wallets.
- Click “Submit”. Your plan includes a 30-day money-back guarantee.
After completing your purchase and confirming your email, you’ll be able to start setting up your website right away.
Other hosts offer similar packages, but Hostinger consistently outperforms them in speed, ease of use, and overall value. You can read my full review of Hostinger here.
Need fully managed WordPress hosting instead? WP Engine is a great choice for performance-focused businesses and developers. They handle the technical stuff like speed tuning and security updates for you.
You can also explore my top-rated web hosting providers if you want to compare alternatives.
Step 3: Claim Your Free Domain
When you sign up for a Premium or higher hosting plan at Hostinger with at least a 12-month commitment, you typically get a domain name free for the first year (on eligible TLDs).
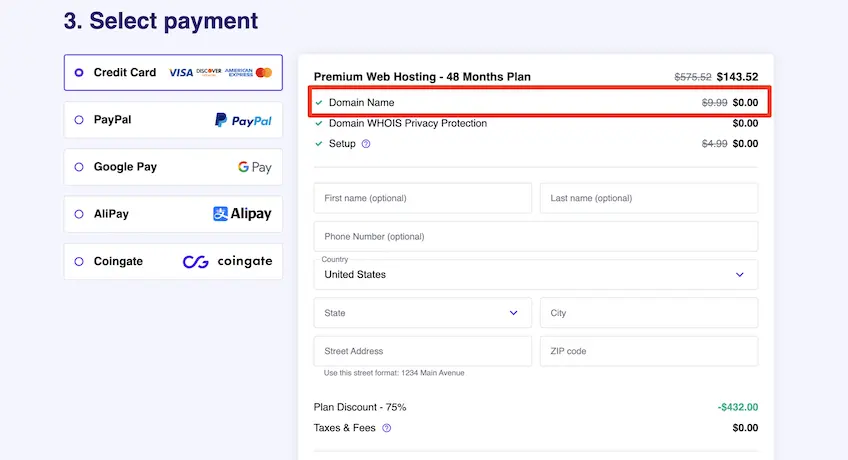
Just remember: the domain will automatically renew after one year at the standard rate (not the intro price). Where available, enable free WHOIS privacy to help protect your personal information.
If you already own a domain and want to switch it out or change it to something new, this is also a good time to do it. You can change your domain name after setup.
Step 4: Install WordPress with Hostinger
Now it’s time to choose a content management system (CMS). For most websites, I recommend WordPress—it’s free, flexible, and beginner-friendly.
Hostinger makes it incredibly easy to install WordPress. Although they offer other CMS options, WordPress is the most widely used platform—and it works for nearly every type of site, from blogs to ecommerce stores.
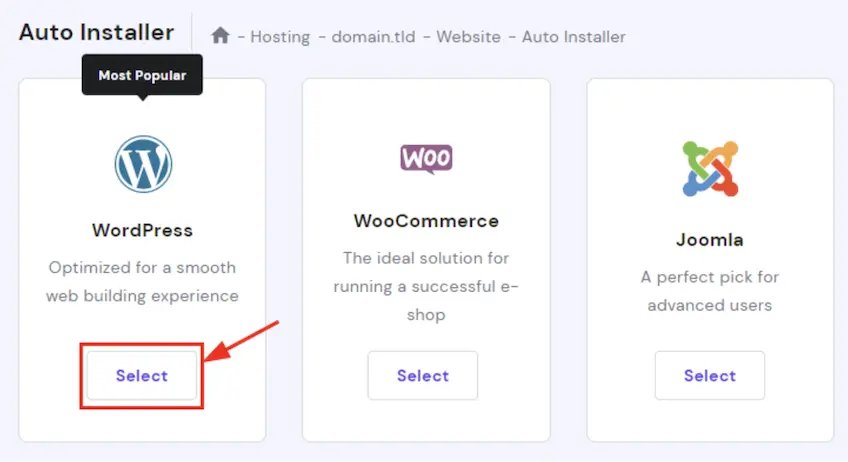
To get started, log into your Hostinger dashboard, go to the Websites tab at the top, and click Manage on your new site. Then scroll to the Auto Installer and select WordPress.
Follow the on-screen setup process. You’ll enter your site’s name and create a new WordPress username and password. These are separate from your Hostinger login credentials.
After installation, you’ll choose a theme—a visual layout template that controls the design of your site.
Don’t overthink this step. You can change your theme at any time and fully customize it later. Right now, just pick a basic design so you can move forward.
Double-check all your information, click confirm, and WordPress will be installed. The process usually takes less than 5 minutes.
Congratulations—you now officially own a piece of the internet!
Step 5: Design Your Website with Customizable Themes
If you like the theme you selected during WordPress installation, feel free to keep it. But if you want to explore more options, WordPress has thousands of free and premium themes to choose from—including modern block themes that you can edit visually in the Site Editor.
Pro tip: Don’t waste too much time trying to find the perfect theme. The important thing is to choose one that looks clean and fits your goals. You can always change it later without losing content.
To install a different theme, go to your WordPress dashboard. You can access it through Hostinger, or go to yourdomain.com/wp-admin and log in using the WordPress credentials you just created.
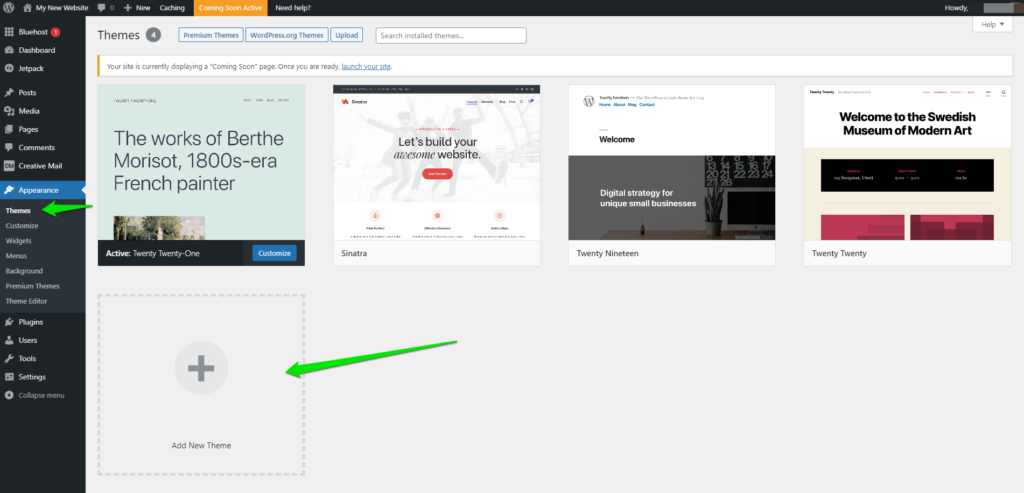
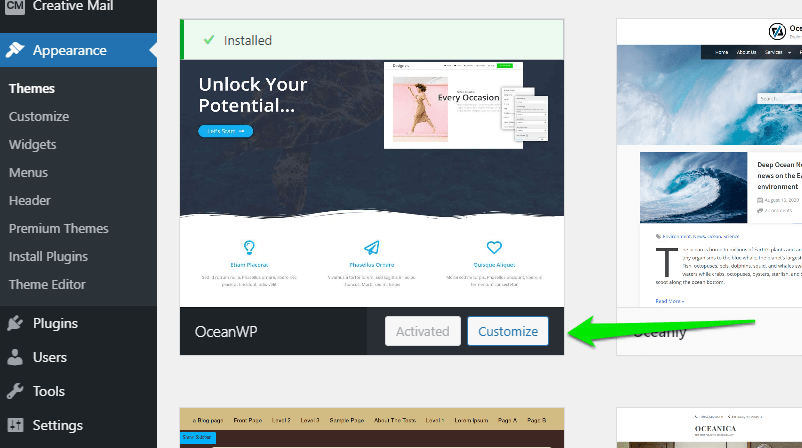
In the sidebar, go to Appearance > Themes > Add New.
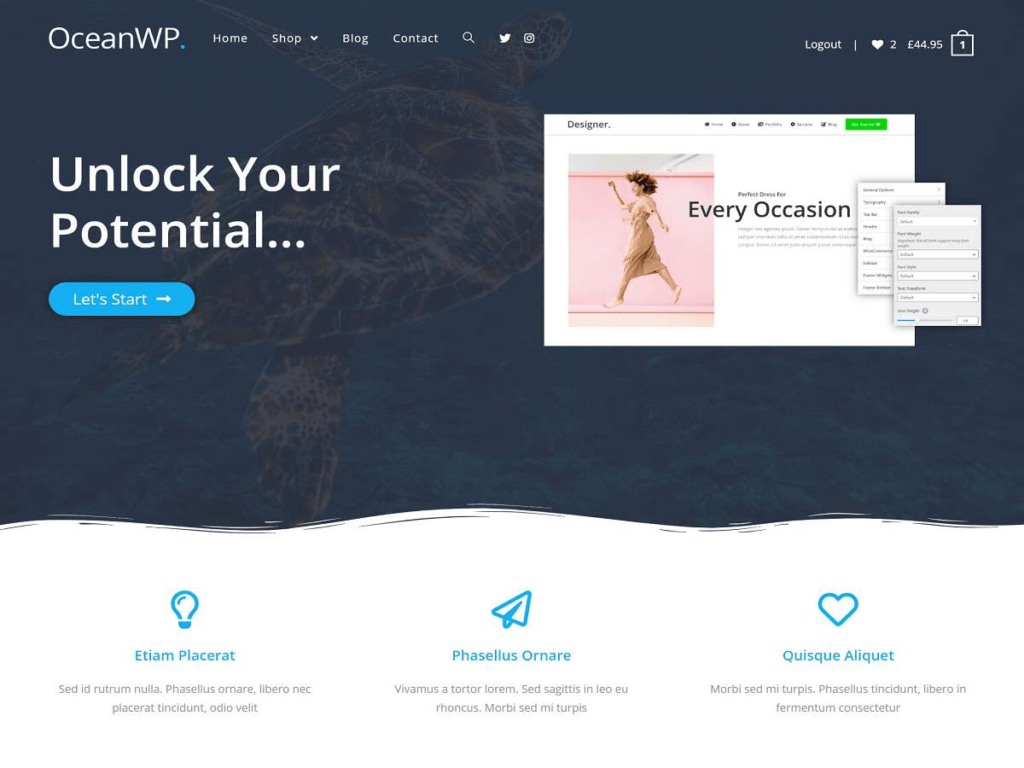
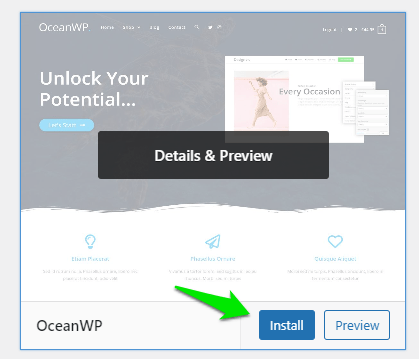
Browse the theme library or search for a specific theme. For this guide, I’ll use OceanWP—a flexible and free theme that works well for blogs, business sites, and even ecommerce stores. Prefer a block theme? Try WordPress’s default “Twenty Twenty-Five” for a clean, fast starting point.
Search for “OceanWP” using the search bar, then click Install.
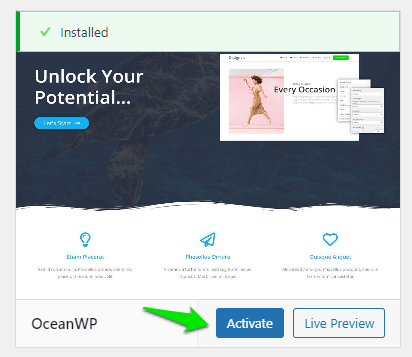
After it installs, click Activate to apply the theme to your website.
You can then customize your theme by clicking the Customize button (for classic themes) or by going to Appearance > Editor (for block themes).
This will open a live preview window along with controls where you can update your colors, menus, logos, fonts, and layout settings.
Each theme includes different settings, but here are the most common customization areas and how important each one is:
- Site Identity: Important. Set your site’s name, tagline, and icon (favicon).
- Menus / Navigation: Very important. Add navigation so visitors can browse your pages easily.
- Widgets / Patterns: Optional. Add sidebar tools (classic themes) or drag-and-drop patterns (block themes).
- Typography: Important. Adjust fonts for headers, body text, and more.
- Header & Footer: Important. Add your logo and customize key branding areas.
- Homepage Settings: Important. Choose a static page or show your latest posts (via Customizer or Settings > Reading).
- Additional CSS: Advanced/Optional. Customize your site further with code (if needed).
Explore and customize your theme until it feels like your own. Then click Publish (or Save in the Site Editor) to lock in your changes.
Right now, your site may still look empty—we’ll fix that next by adding pages and content.
Step 6: Build Your Website’s Architecture
Think of your website like a house. Right now, you’ve got the foundation (domain and hosting) and the frame (theme). But you still need to build rooms—and in website terms, that means pages.
Pages are where your visitors will read about your brand, contact you, browse your products, or consume your content. These pages shape the structure and navigation of your site.
At a minimum, most websites should have these pages:
- Homepage: The front door of your website. It introduces your site and guides people to what they’re looking for.
- Contact: Gives visitors a way to reach you. Essential for credibility and customer communication.
- About: Shares your story, background, mission, or team—helps visitors connect with you.
- Store: If you sell products or services, this is where you showcase and sell them. (Optional for ecommerce sites.)
- Blog: A collection of your articles, news, tutorials, or content. Blogs help build traffic and authority.
I’ll walk through how to create your first page—starting with your homepage.
How to Create a Homepage
With OceanWP (or most classic themes), you can choose between two homepage types:
- Latest Posts: Automatically displays your newest blog posts on the homepage.
- Static Page: A standalone page that you design manually to serve as your homepage.
If you want full control over your homepage content and layout, I recommend using a static page.
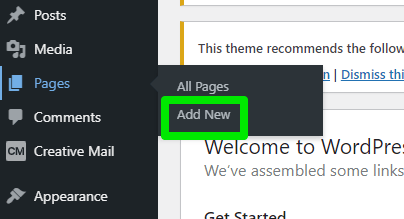
From your WordPress dashboard, go to Pages > Add New to create a new page.
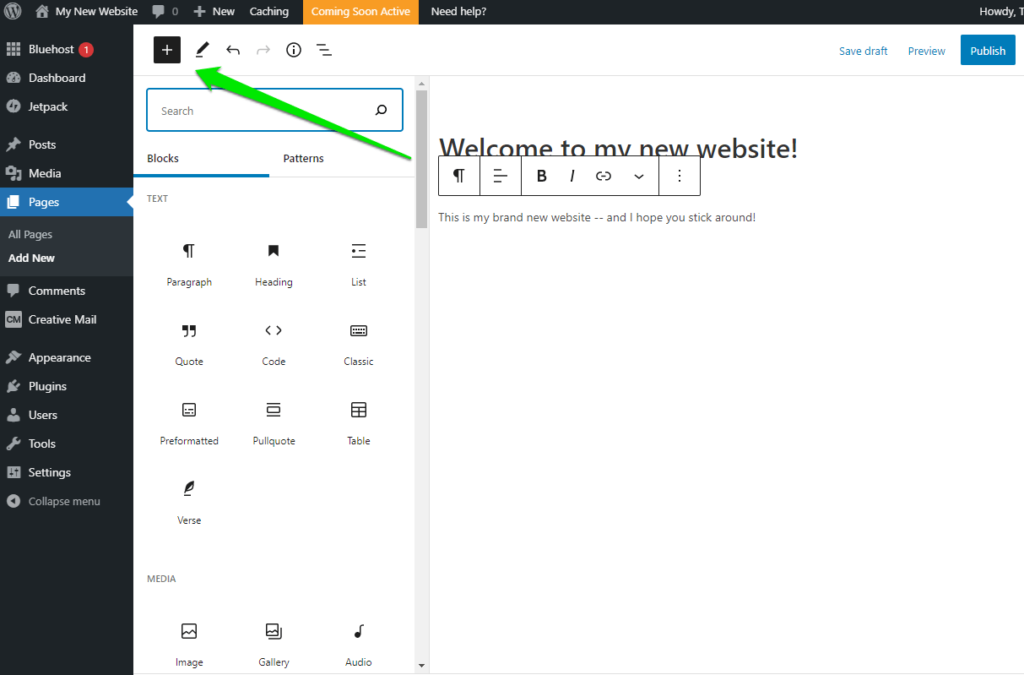
You’ll be taken to the page editor where you can add a title and content—text, images, video, buttons, or anything else you want to show on your homepage.
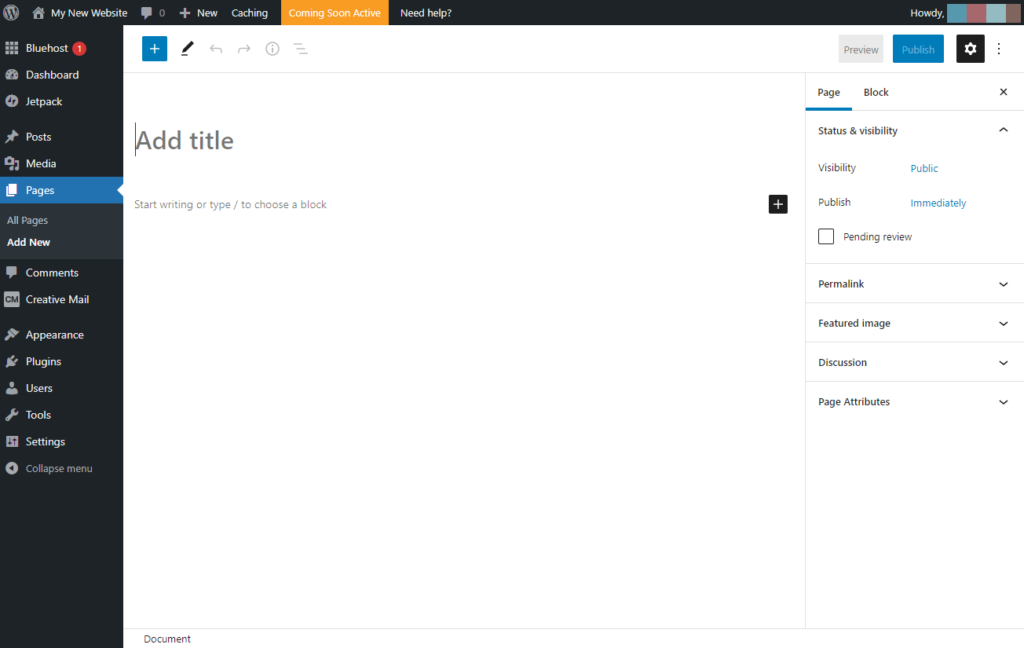
Click the + icon to add content blocks like headings, images, quotes, or lists. This is how you build your page layout visually.
Use the toolbar at the top right to save drafts, preview your page, and publish it when you’re ready.
- Save Draft: Save your work without publishing.
- Preview: See what the page will look like live.
- Publish: Makes the page visible to the public.
- Settings (gear icon): Adjust visibility, scheduling, URL, featured image, and more.
- Options (three dots): Access advanced editor preferences.
Create a simple homepage now—even if it’s just a title and some placeholder text. You can always improve it later.
After you click Publish, set it as your homepage. In classic themes, go to Appearance > Customize > Homepage Settings and select A static page. In block themes, go to Settings > Reading and choose your homepage there (or set it within the Site Editor).
Click Publish (or Save) to lock it in. You now have a custom homepage!
How to Create New Landing Pages
The process is the same as creating your homepage. Go to Pages > Add New and start building any page you want.
Here are some page ideas to get you started:
- About Us
- Contact Us
- Products / Services
- FAQs
- Blog
- Customer Testimonials
- Resources or Downloads
- Careers
You don’t need to build every page now. Start with a few key ones and expand over time.
Step 7: Connect Your Web Pages with Menus
Navigation menus help visitors move around your website. OceanWP (and most WordPress themes) let you create menus with just a few clicks.
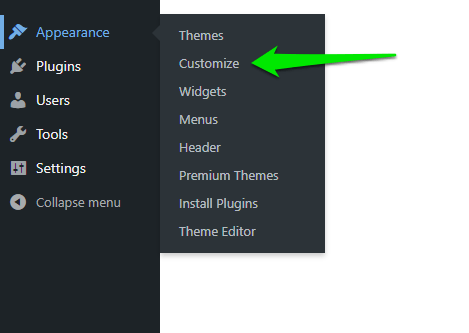
Using a classic theme? Go to Appearance > Customize in your WordPress dashboard. Using a block theme? Go to Appearance > Editor and edit your Navigation block there.
In the Customizer, click Menus > Create New Menu.
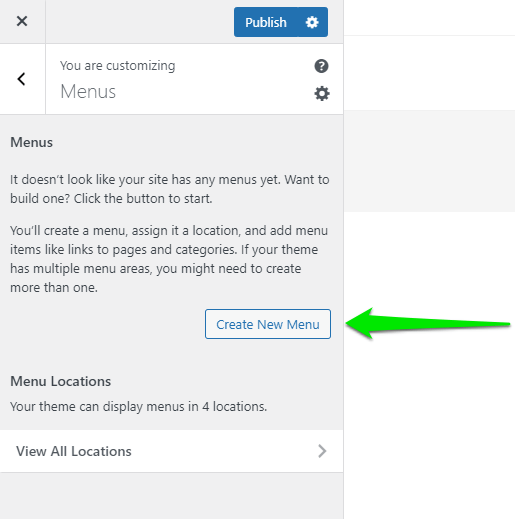
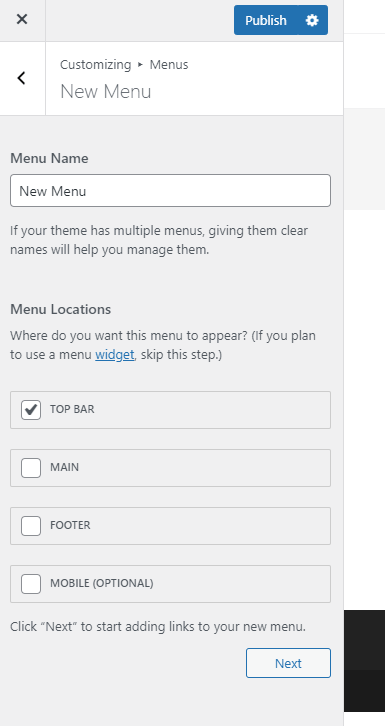
Give your menu a name (like “Main Menu”) and select where it should appear—such as the Top Bar. You can always change this later. Click Next to continue.
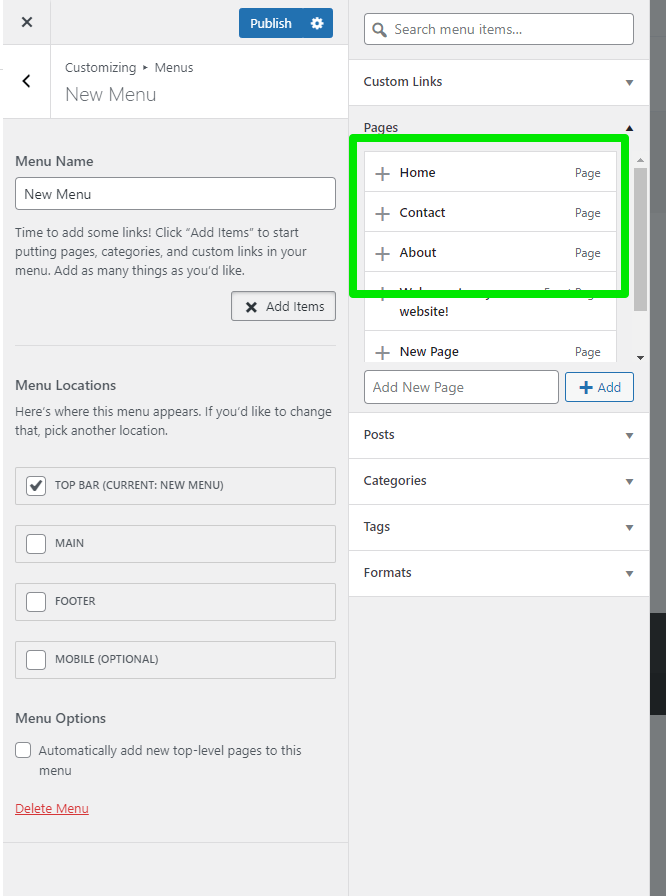
Now it’s time to add items to your menu. Click + Add Items.
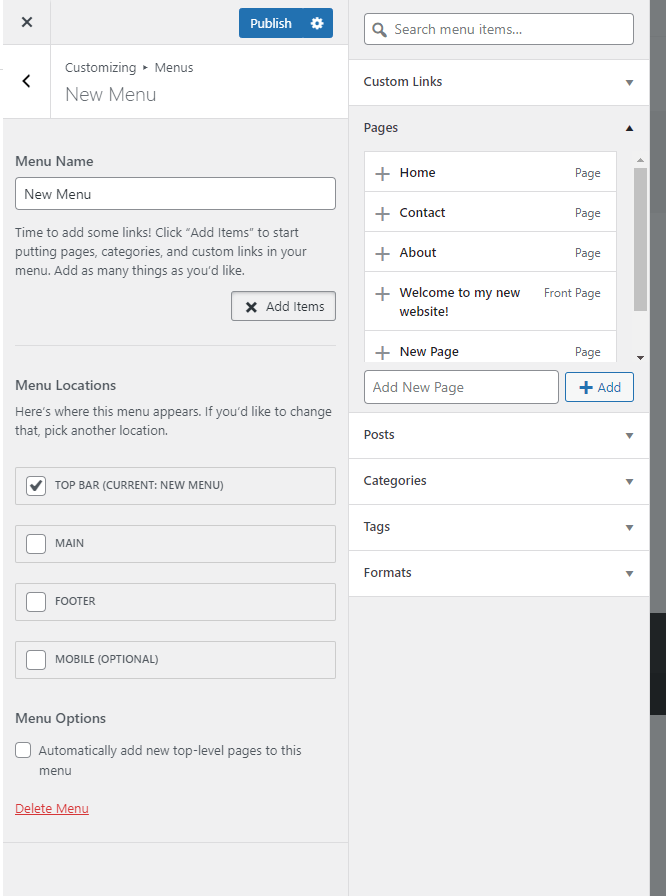
You can add pages (like Home, About, Contact), blog posts, custom links, categories, and more.
Start by adding your most important pages—typically Home, About, and Contact.
Click each page under the Pages section to include it in your menu.
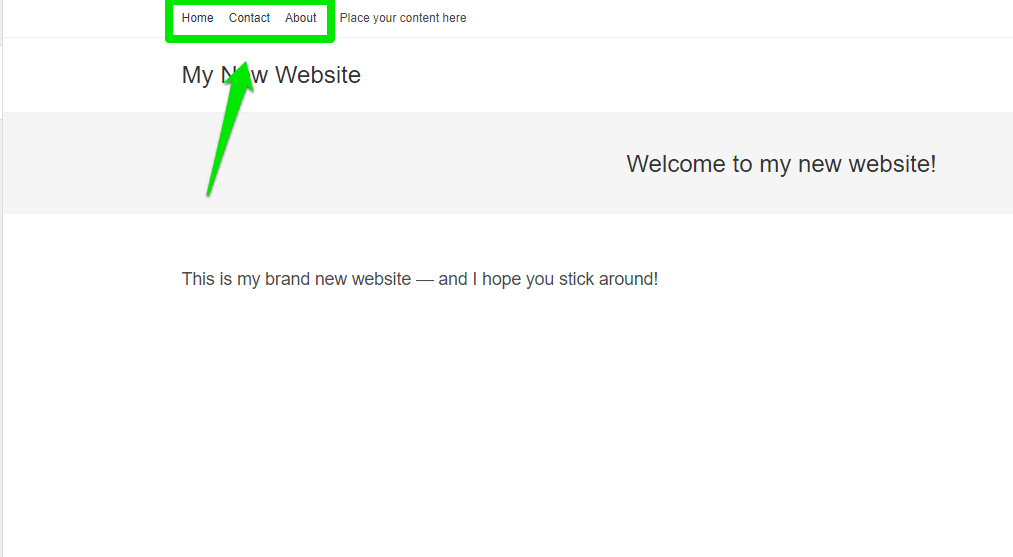
Those pages will now appear in your top bar navigation menu across your entire site.
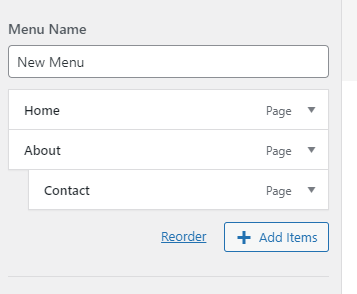
You can even create dropdown menus by nesting items under parent menu items.
For example, if you want your Contact page to appear under your About section, simply drag it slightly to the right beneath About.
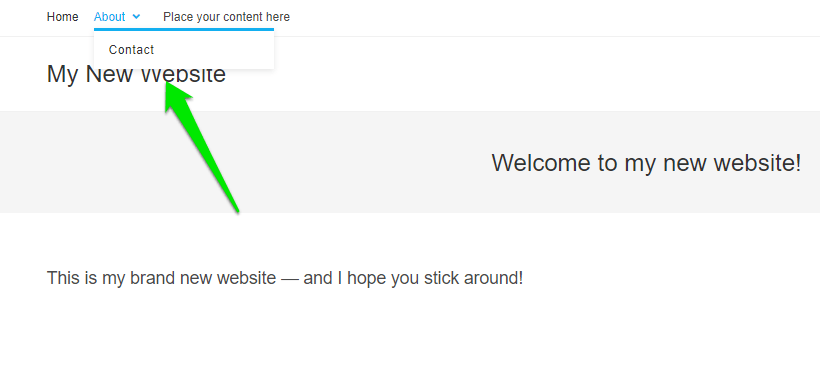
Your visitors will now see a dropdown when they hover over the About link, making your site easier to navigate.
Once you’ve added everything and arranged your menu, click Publish. If you’re using the Site Editor, click Save.
And that’s it! You’ve now connected your web pages with a fully functional menu.
Visit your website to see it live:
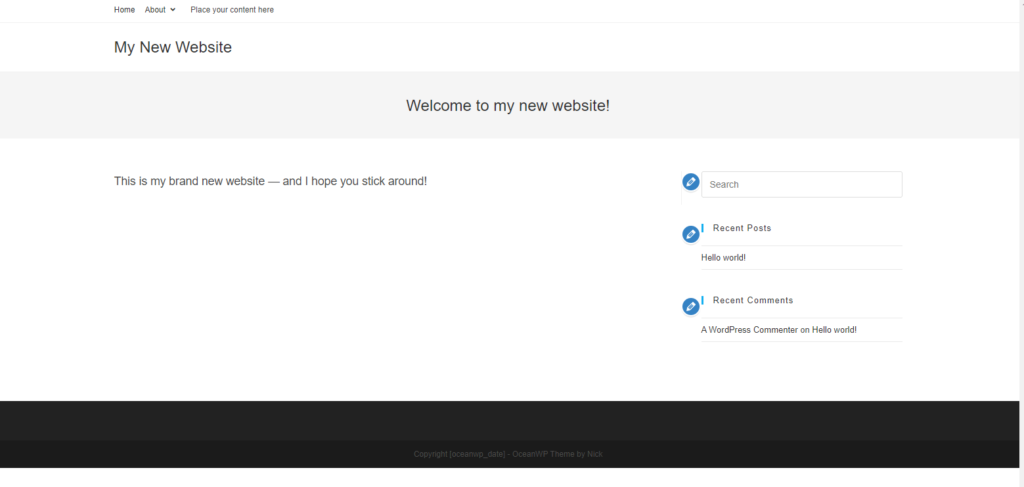
Sure, it might still look a little bare—but now it’s ready for your unique branding and content.
You’ve done the hard part. Now it’s time to turn your blank website into something truly valuable.
Step 8: Launch Essentials—SSL, SEO Basics, and Speed
Before you announce your site, lock in these quick wins. They improve trust, discoverability, and performance from day one.
- Enable SSL (HTTPS): In Hostinger, turn on the free SSL certificate so your site loads securely. Browsers flag non-HTTPS sites, and many features (like payment gateways) require HTTPS.
- Set clean URLs: In WordPress, go to Settings > Permalinks and choose Post name so links are human-readable.
- Add basic SEO: Install a reputable SEO plugin to set titles, meta descriptions, and generate an XML sitemap. Create helpful, human-first content and organize it with clear headings. Submit your sitemap to Google Search Console for faster discovery.
- Connect analytics: Add website analytics so you can track traffic and pages that need improvement. Set up Google Analytics 4 and verify your site in Google Search Console.
- Speed boosters: Turn on caching in your host or use a lightweight performance plugin. Compress large images before uploading (use WebP/AVIF where possible) and consider enabling a CDN for global visitors.
- Backups & updates: Enable automatic backups and keep WordPress, themes, and plugins updated for security and stability. Use a staging site for major changes if your plan supports it.
- Security basics: Use strong passwords and enable two-factor authentication for admin users. Limit admin accounts and remove unused plugins/themes.
- Legal basics: Add a Privacy Policy and Terms page if you collect user data or run ads. If you use cookies for analytics or ads, include a cookie notice where required.
You Just Made Your First Website! What’s Next?
Congratulations! You’ve officially built your first website. That’s a huge achievement.
Now that your site is live with Hostinger and WordPress, you can start customizing it, adding content, and even monetizing it if that’s your goal. As you grow, consider enabling two-factor authentication for admin users, adding structured data via your SEO plugin, and building internal links between related pages.
Remember: the journey doesn’t end here. A great website is always evolving. Keep publishing, updating, and optimizing as you go.