This step-by-step guide shows you exactly how to migrate your ecommerce site to Shopify from any platform in four clear steps—without losing SEO equity, orders, or traffic.
I’ll walk you through the process from prep to launch so you can move your website to Shopify with minimal risk and zero guesswork.
Let’s begin.
Step 1: Build your new Shopify site
First, let’s get your Shopify store built and ready behind the scenes.
While you work, your new Shopify store stays locked behind a password, so it won’t conflict with your current site. You control when it goes live and becomes publicly accessible. You can turn the password on/off under Online Store > Preferences > Store access (password removal requires choosing a plan).
Your draft store lives on a Shopify subdomain like company.myshopify.com, so there’s no overlap with your current domain. Orders and traffic continue flowing to your existing site while you build and test. (Development stores remain password-protected until moved to a paid plan.)
You’ll sign up for Shopify, confirm the temporary subdomain (don’t sweat the name—customers won’t see it), and choose a theme that fits your brand and catalog. Then load products, create core pages (Homepage, About, Contact, Policy pages), and connect payments. While you’re here, also configure shipping rates and locations, taxes, checkout settings, and a test order so you know the full purchase flow works end to end.

If you’ve never set up a Shopify store before, you may want to pause here and read my complete guide on how to create your ecommerce store on Shopify for detailed walkthroughs of themes, payments, shipping, and settings.
Plan to rebuild some elements by hand (like custom homepage sections). It’s tedious, but the upsides—faster checkout, built-in payments, app ecosystem, and reliable hosting—far outweigh the one-time effort of migrating.
Transferring your store to Shopify from WooCommerce
If you’re transferring from WooCommerce, you’re in good shape. Shopify supports importing the bulk of your product data so you don’t have to start from scratch.
As you create your Shopify store, you can indicate that you’re migrating from another platform (like WooCommerce) and access the import option directly from your admin once the store is created. This speeds up the initial catalog build and reduces manual work.
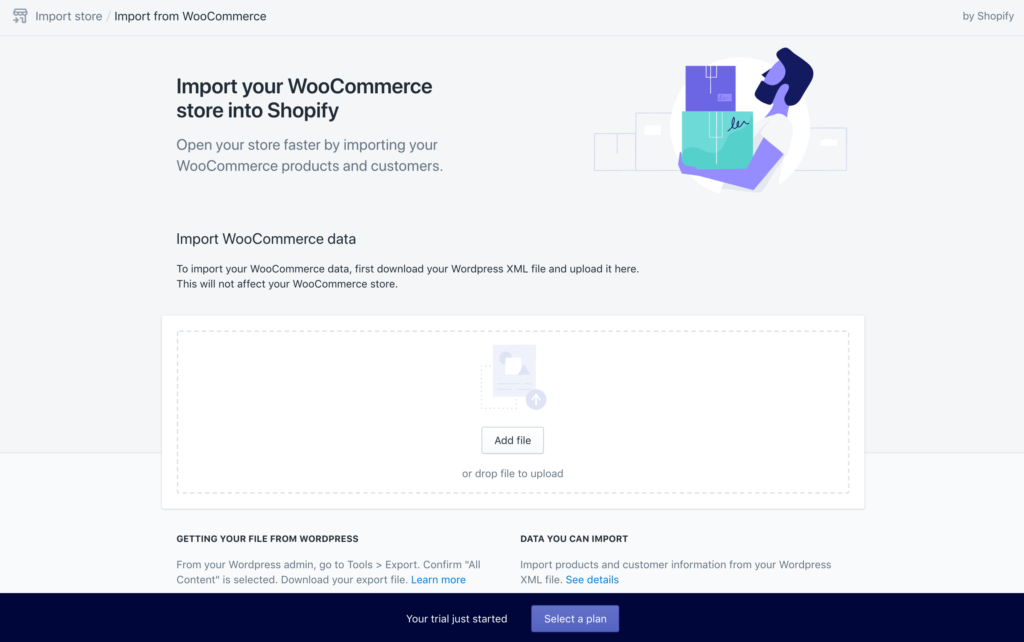
Batch importing products and customers to Shopify with a CSV
Even if you’re not moving from WooCommerce, you can import products and customers with CSV files. (Orders require special handling and typically can’t be imported directly in the Shopify admin on standard plans; most merchants use migration apps for order history. Shopify Plus customers have more options—details below.)
To import products, go to Products in the admin and click Import. Download the sample CSV and match your file to its format—including handles, variants, images, and inventory—so Shopify can map fields correctly.
The process for importing customers is similar: format your CSV per the guidelines (including opt-in/marketing fields and addresses), then navigate to Customers > Import customers.
You can also use a migration app from the Shopify App Store. Here’s one called Cart2Cart. Pricing usually scales with the number of records (products, customers, orders). If you go this route, run a small test import first to validate mappings before doing the full job.
Prefer hands-off help? Shopify lets you hire a store expert through its Services Marketplace for migrations and theme setup.
Transferring your store with Shopify Plus
If you have Shopify Plus, the migration is even smoother. You’ll have access to the Transporter app for bulk importing products, customers, and orders with high-volume CSVs. (If you’re not on Plus, third-party apps like Matrixify can import order history.)
Shopify Plus typically makes sense for larger businesses with significant revenue and complex catalogs. For data structure and field requirements, review the official CSV specifications outlined here before running your first import.
I highly recommend importing historical customers and order data if you have access to Shopify Plus. Consolidating your data improves analytics, LTV reporting, and segmentation for email/SMS.
Step 2: Get your redirects ready
There are two big reasons to prepare URL redirects before you launch the new store.
First, redirects ensure that anyone visiting an old URL lands on the correct page of your new site, preventing 404s that cost sales.
Second, 301 redirects pass existing page authority to Shopify so Google doesn’t treat your catalog as brand new. This helps minimize post-migration traffic dips.
Shopify makes redirects straightforward. In your Shopify admin, go to Content > Menus > URL redirects to add them individually, or import/export in bulk via CSV. (Shopify moved redirects out of the old Online Store > Navigation path.)

If you follow this process, all redirects will automatically go live the moment you launch your Shopify store.
Create a redirect for every URL that changes. For example, Shopify product URLs follow: company.com/products/product-name.
If your old product URLs use a different pattern, add a redirect for each product. Do the same for collections, blog posts, and content pages that move to a new path.
As you build, check the URL path for every product and page in Shopify. If it matches your old site, you’re good. If it’s different (including trailing slashes or case differences), create a redirect.
Do I have to redirect every URL from my old site?
You don’t need to redirect every single legacy URL. Use this simple rule of thumb:
Redirect every URL that has a clear corresponding page on the new site. 404 everything else.
A 404 tells visitors (and search engines) the page no longer exists. That’s okay. Users understand a clean 404 more than confusing redirect chains, and Google has repeatedly said it prefers 404s over forced redirects when there’s no true equivalent page.
I’ve seen sites with thousands of unnecessary redirects cause headaches for users and infrastructure. Keep your list focused and high-quality. Map true one-to-one matches, and let outdated or thin pages return a 404 instead of sending folks somewhere irrelevant.
Bottom line: build a targeted redirect list for changed URLs, and allow the rest to 404 once you switch to Shopify.
Step 3: Go live and point your domain to Shopify
Now it’s time to go live.
You can buy a domain directly from Shopify, but if you already have one at a registrar, you’ll just connect it.
In short, you’ll point your domain to Shopify so visitors reach your new store.
Log in to your domain registrar and update DNS. Point your root domain’s A/AAAA records to Shopify and the www CNAME to Shopify’s host, then connect the domain in Settings > Domains in your Shopify admin.
Specifically, Shopify lists the IPv4 A record 23.227.38.65, the IPv6 AAAA record 2620:0127:f00f:5:: (expanded 2620:0127:f00f:0005:0000:0000:0000:0000), and the www CNAME shops.myshopify.com. Some regions may display a different but valid A record after connection.
After saving DNS, it can take up to 48 hours for the change to fully propagate worldwide. Time your switch for a low-traffic window if you want the cleanest cutover.
If you run a smaller store and a brief propagation window isn’t a big deal, switch whenever. If you want a cleaner cutover, time your update for your lowest-traffic period.
For most stores, the “maintenance window” is the middle of the night or early morning on a weekend. For many teams, a weekday early morning works, too—so you have a full workday to monitor and address anything unexpected.
My advice on when to switch your site
- If revenue risk is high, do the domain switch in the middle of the night during your typical low-traffic window.
- If the stakes are moderate, switch on a Monday morning so you have the entire week to test & tune. Avoid Friday launches to prevent weekend fire drills.
What happens if something goes horribly wrong?
Keep your old ecommerce site running during the transition. Your domain and URLs will point to Shopify, but having the previous system available gives you a fast fallback if anything critical breaks.
Edge cases happen—payment gateways, third-party apps, taxes, shipping, or inventory syncs can surprise you. If a serious issue pops up, revert your DNS to the old settings. It can take a few hours to fully roll back, but it will stabilize.
I like to keep the old site accessible (not publicly linked) for at least 30 days after launch to ensure everything is stable.
Step 4: Shut down your old ecommerce site
Once the new site has been live for 30+ days with healthy sales and no critical issues, shut down the old ecommerce platform.
Leaving legacy systems online causes problems later: duplicate carts or checkouts, accidental orders, and unnecessary software spend.
I’ve seen old checkout pages surface months later and create fulfillment messes. Don’t let that happen.
Cancel your old ecommerce subscription (and any old apps or add-ons), remove payment credentials from the legacy system, and archive any data you still need for accounting or compliance. That provider should turn everything off once you cancel.
With the old stack decommissioned, your business will be fully transitioned to Shopify—clean, simple, and easier to maintain.