We write a ton of blog posts for our websites.
Writing has become a major part of our life throughout the years.
People recognize this and often ask us the same question: How do you come up with these new ideas?
Truthfully, writer’s block happens to all of us. Just ask any writer, and they’ll tell you the same thing.
Sometimes you sit down, and the words don’t spill onto the page as easy as you’d like them to. We can relate and empathize with you there.
That said, we don’t have much trouble coming up with new ideas. We came up with a system a while ago that made it easy for us to constantly source new topics to write about.
These strategies aren’t limited to blog posts.
They can be used to come up with content for research articles, podcasts, and ebooks. You can even use them to come up with ideas for your new video blog or whatever else you’re working on.
Here are the top 15 ways to source new content ideas.
1. Create topic lists in bunches
When you’re ready to write new content, you shouldn’t be sitting down to decide what you’ll write about.
This wastes time, and it’s inefficient.
That’s why we like to create long lists of potential topics all at once. Spend a few hours researching subjects for new ideas.
Give yourself enough topics for at least a month or two. If you’re publishing three posts per week, you’ll want to aim for at least 12 to 24 new ideas.
Sometimes, we come up with 50 topics at a time.
When your mind is focused on one task, it’s much easier to brainstorm. Come up with the ideas first. You can perfect the titles when you start writing.
This strategy will make it easier for you to pump out content. You’ll be able to pick a topic from your list and start writing.
2. Social media followers
Start with people who follow you on social media. Click on their profiles and see what they’re talking about.
Read through tweets. Check out photos. See what brands they are interacting with.
Some of these may lead to a dead end, but others can be extremely beneficial to your brainstorming process.
Plus, if you have tons of social media followers, you’ll always have a huge source of ideas.
You could even ask your followers directly. Post a question on your Instagram story, and ask for replies.
For example, let’s say you have a brand related to the fitness industry. Ask your followers a question about their favorite unconventional workouts or what meals help them lose weight.
The answers will help you come up with new content ideas.
3. Blog comments
Review the comments on all your posts. You should do that even when you’re not trying to come up with new ideas.
It gives you a chance to communicate with your audience. But remember to always respond to their comments.
These comments can be a great source of inspiration. We can pull concepts from them to write about in the future.
If people ask questions in the comments section, those questions could be used as titles for a new topic. Just tweak a few words or so to make it SEO friendly.
Regardless of what your audience comments about, we’re confident you can generate at least one or two ideas from this section of each post you publish.
The great thing about this source is it’s nearly never-ending. As long as you keep publishing new posts, there will always be new ideas hidden in the comments.
4. Conduct interviews
How do you know what type of content your audience wants to see? Ask them directly to tell you.
Conduct interviews. Ask them about their habits.
The great thing about an interview is it doesn’t have to be direct. You don’t have to have a clear black and white question with a definitive yes or no answer.
Just find ways to get people talking.
You’d be surprised how interesting some of these statements can be. The responders may start feeding you new content ideas without even realizing it.
It’s in your best interest to record your interviews. That way, you can review them later instead of frantically trying to write things down while someone is speaking.
5. Competitor websites
If you’re not sure what to write about, check out your competitor’s blog. This is one of the best ways to come up with long lists of topics in bunches.
Don’t get us wrong, we’re not telling you to steal or plagiarize. But there is nothing wrong with using their titles and concepts for idea generation.
Look through their posts and start writing down topics you haven’t covered yet.
You have a huge advantage here because you can try to make your post about the same topic even better than theirs. For example, let’s say you’re using a top 10 list from a competitor’s blog as an inspiration for a new content idea. Well, you can try to one up them by creating a top 15 list on the same topic.
In addition to your competitor’s titles for new content ideas, you can also look at other aspects of their website.
Read through their comments section. You already did this with the comments on your website, so it makes sense there will be ideas buried in other sites as well.
See if they have an FAQ page on their site. These questions could all be ideas for the topics you can write about.
6. Google search suggestions
If you’ve got a general topic in mind, start searching for it on Google:

Look at all the suggested topics that come up when we type in “email marketing.”
These suggestions could all be topics to cover.
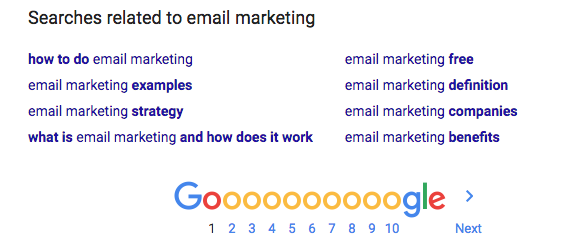
In addition to the search suggestions, you can also check out the related searches at the bottom of the page:
If you’re not sure what to search for to generate these suggestions, start with content titles you’ve already posted.
The reason why this is such a good strategy is because you know the topics will be relevant to your audience.
Plus, you can assume these new titles will be SEO friendly since you sourced them through Google.
7. Recent events
Depending on your brand, you may not want to be reporting breaking news.
It won’t speak to your audience, and it doesn’t fit with your company image.
But you can definitely come up with ways to get creative. When you’re watching the news or reading updates from an online source, try to figure out how you can make these topics relevant to your brand.
Look up local events or national trade shows related to your industry.
Give your audience information about the event. Tell them what they need to know if they want to attend or register.
8. Product reviews
Think about recent products you’ve used related to your brand or industry.
You can review these topics in a blog post or video demonstration.
For example, let’s say you run a website related to camping and other outdoor adventures. If you go on a fishing trip and use a new pole, you could write about your experience with the new gear.
If your company is releasing a new product, use this method to build hype for a new product launch.
You could even write reviews for products you don’t own and never used. Just look up products online, and base your discussion around online customer reviews.
9. Topic generator platforms
If you’re still stuck and can’t think of anything to write about or research, use online sources to help you generate topics.
One of our favorites is the HubSpot blog ideas generator.

As you can see, it’s pretty simple.
Just add some keywords you want to include, and the tool will come up with a list of potential ideas.
In addition to the HubSpot tool, you can check out Portent’s content idea generator.
10. Personal stories
When in doubt, tell a story about something that happened to you.
It could be a success story. Or maybe tell your audience a story about a mistake you made.
How did you learn from it? How did you get to be where you are today?
It could be a recent story or one from the past. Master the art of storytelling.
Personal stories are great because they make your content unique. While people may have similar stories, the details of yours won’t be the same as anyone else’s.
11. Sign up for newsletters
Get content ideas delivered directly to your inbox.
Sign up for industry newsletters. They’ll keep you up to date with trending topics, news, and events.
You can even sign up for competitor newsletters. See what they are discussing with their customers.
Use the topics covered in these emails to generate new content ideas.
12. YouTube videos
All businesses should have a YouTube profile. Use it to upload videos, and then share those videos on all your marketing channels.
But YouTube can also be a resource for coming up with new ideas.
Treat it the same way as a Google search, which we previously discussed. As you start to type in a subject, you’ll see suggestions.
When you watch a video, there will be related videos on the sidebar for you to consider as well.
Let’s say your brand is in the automotive industry. Here’s an example from the ChrisFix YouTube channel:

This video is about how to change the oil in a car. But look at the videos on the sidebar we’ve highlighted.
These related topics are about how to replace brake pads and how to repair rust on a car. Both of these are suitable new content ideas related to this industry.
In addition to finding topics based on the titles of videos, you can also watch some of them to find some inspiration within their content.
Just as you did with your website and the websites of your competitors, you’ll also want to read through the comments section of YouTube videos. Check out the comments on your videos as well as the videos you’re watching to help generate new ideas.
13. New products and technology
If your company sells something, writing content about a new product release is a win-win scenario.
We briefly mentioned this earlier when we talked about product reviews.
First, you’ll be able to generate a buzz for the release, which will ultimately help you drive sales. But it also gives you something to write about.
Furthermore, staying up to date with the latest technology trends can help you come up with new topics to cover.
It doesn’t matter what industry you’re in or what type of business you have, new technology is evolving everywhere.
There could be new software directly related to your business or just a general advancement in your industry. These are all scenarios to consider sharing with your audience.
14. Use data and analytics
Have you seen a recent study related to your brand or industry?
Write about it.
You don’t have to be the one conducting the research, although that would make the content even better. But to save time, you can use new data to write about a subject.
For example, let’s say you’re in the fashion industry. This study may have been something worth writing about:

You could have used this study to talk about fashion trends that don’t require wearing a tie. Or maybe share ideas about how to wear a loose tie with the top shirt button unfastened.
You could even have shared a video demonstration about how to properly tie a tie so that it’s not too tight around the neck.
All these ideas came from new facts in your industry.
15. Revisit previously published content
Your old content shouldn’t be dead and forgotten. Use those topics for ideas too.
Just re-work the titles, and write a newer post from a different angle.
For example, let’s say your company is in the field of mobile app marketing. If you had written a post about how to get ranked on the app store, a new topic could be how to boost your ranking to get more downloads.
Although the topics are similar, they are not quite the same.
Or let’s say you’re in the personal finance space. An old topic might have been about how to save for retirement. But you can take some of the content from that piece and write a new article about the best retirement accounts to invest in.
If an old post has outdated research, you can write a new one that includes the updated information.
Conclusion
While you may suffer from writer’s block from time to time, you should never be struggling to come up with new content ideas.
There are many resources at your disposal. Learn how to take advantage of them.
Come up with a long list of new ideas at once.
Go through this guide of tips and tricks, and you won’t have any problems.