The web hosting provider you choose has a bigger impact on how your site performs than most people realize. Your host influences page speed (which affects SEO and conversions), uptime reliability, built-in security (firewalls, malware scanning, automatic SSL), backup options, and resource limits for storage, CPU, RAM, and bandwidth. If you’re hitting performance ceilings, fighting security issues, or just want better support and pricing, it’s smart to migrate your website to a new web host.
Whatever your reason for switching, the steps below walk you through the entire process in plain English so even non-technical site owners can complete a clean, low-risk migration.
Migrate Your Website to a New Web Host in 8 Easy Steps
You’re about to see that migrating your website to Bluehost can be very straightforward. But there’s no one-size-fits-all web host, and the best choice depends on your site’s goals, tech stack, and budget. If you’re unsure which hosting provider to migrate to, check out my list of the top web hosting companies.
Follow these essential steps to complete your migration with minimal downtime and without breaking important site features:
- Sign Up for Bluehost
- Transfer Files Using FTP
- Export Your Database
- Transfer Your Database
- Configure Settings
- Transfer Any Custom Email Addresses
- Update Your Domain Name Server (DNS)
- Carry Out a Website Test
Step 1: Sign Up for Bluehost
Not so tech-savvy? Bluehost provides a WordPress migration tool and expert-assisted options so you don’t have to wrangle files and databases yourself.
What’s current in 2026: Bluehost’s self-service WordPress migration is now integrated with InstaWP to streamline moves for eligible WordPress sites. Bluehost also offers assisted migrations and a paid Pro cPanel Migration option if you need an entire cPanel account moved as-is. These services and eligibility are reviewed case-by-case.
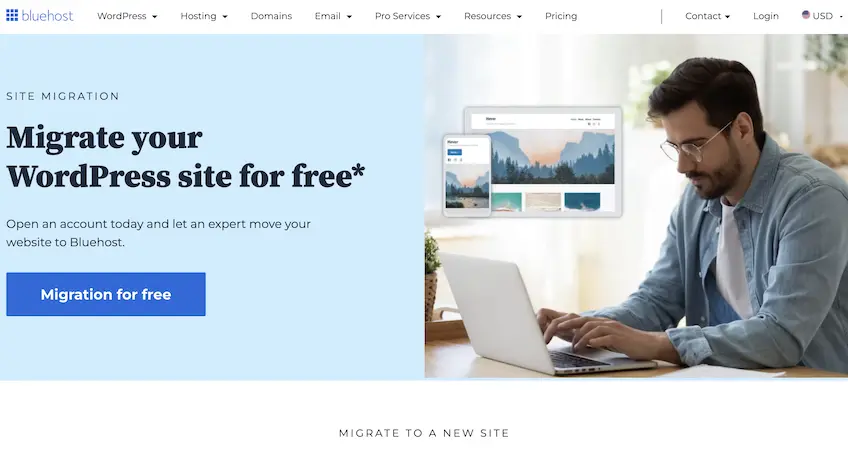
To get started, choose your Bluehost plan and create an account.
- From there, open the Bluehost Marketplace on the left side of your dashboard and go to Migration Services.
- Enter your website’s domain and run the compatibility check.
- When the check succeeds, install the Bluehost Site Migrator plugin to begin the secure transfer.
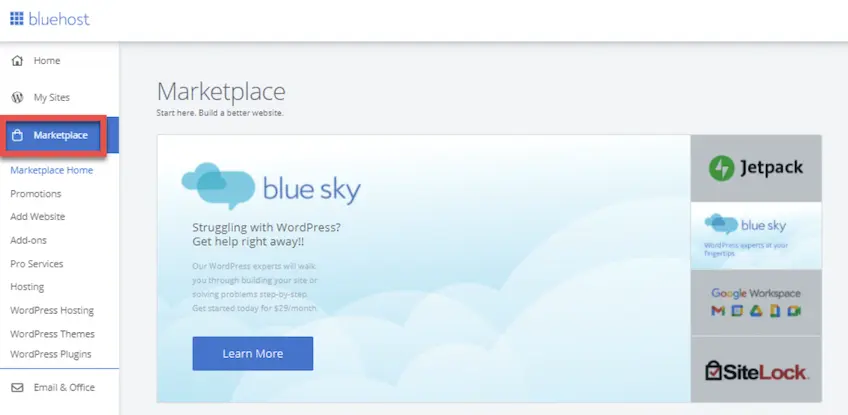
Once the plugin is installed and activated, Bluehost’s process takes over. Most transfers complete within a couple of days. You’ll be notified when the migration is ready so you can review the site before finalizing.
You’ll also need to point your DNS to the new site—Bluehost provides step-by-step guidance.
Support is available 24/7, which makes the entire move less stressful before, during, and after migration.
If you’d prefer to migrate manually—or you’re moving to a host that doesn’t offer migration tooling—follow the steps below.
Step 2: Transfer Files Using FTP
Copy your files from the old host to the new one so your themes, plugins, uploads, and other assets come along. Many hosts let you generate backups from the control panel (often under Files > Backup or Backup Wizard) that you can download and store locally.
From your existing host’s control panel, go to Files > Site Backup & Restore (or the equivalent), choose Full Backup, select what to include, choose a format, and download the archive to your computer.
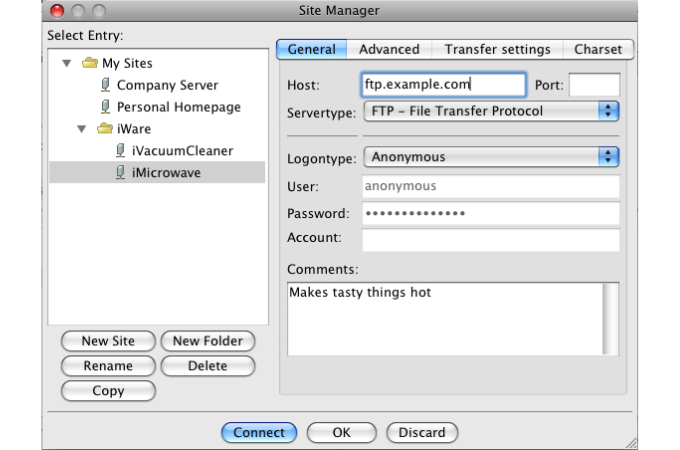
If backup tools aren’t available, use a File Transfer Protocol client. Prefer SFTP (secure) when possible. A popular free option is FileZilla. Here’s how to move your site with it:
- Install FileZilla and connect using your old host’s FTP/SFTP credentials—host, username, password, and port. You’ll find these in your hosting dashboard.
- Select all site files (commonly in
public_html), right-click, and choose Download to save them locally.
- Open a new FileZilla window and connect to your new host using its FTP/SFTP credentials. Drag your saved files from your computer into the new host’s web root to upload.
Step 3: Export Your Database
Next, determine whether your site uses a database. Most CMS-driven sites (WordPress, Joomla, Drupal, many ecommerce apps) store content in a MySQL/MariaDB database. If your site is truly static (just HTML/CSS/JS with no comments or dynamic content), you likely don’t have a database to migrate.
Most hosts include phpMyAdmin for database exports. You’ll find it in your control panel alongside your MySQL tools. Follow these steps to export:
- Open phpMyAdmin from Databases in your hosting control panel.
- Select your site’s database from the left column, click Export in the top menu, choose the default (Quick) method, then click Go to download the
.sqlfile.
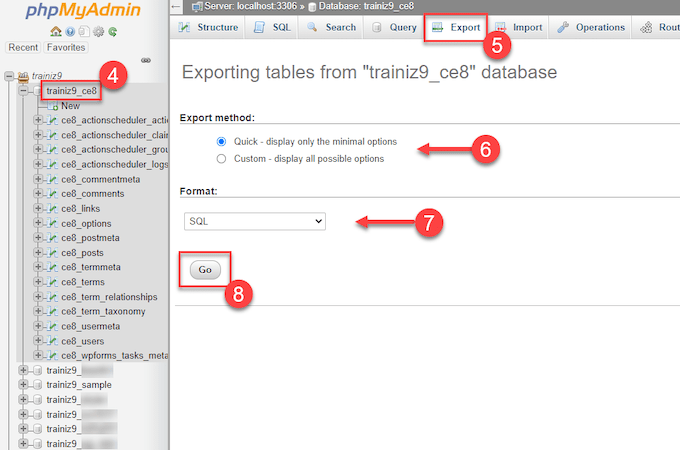
.sql file using phpMyAdmin.Your database export is now saved on your computer and ready to upload to your new host.
Step 4: Transfer Your Database
Create an empty database at your new host, then import the export you just created. Here’s the typical flow:
- In your new host’s control panel, open Databases and choose MySQL Databases.
- Create a new database and a user with a strong password, then grant that user all privileges on the new database.
- Return to Databases, open phpMyAdmin, and select the new database in the left column.
- Click Import in the top menu, choose your exported
.sqlfile, and upload it. For large files, your host may provide an alternate import method or higher upload limits.
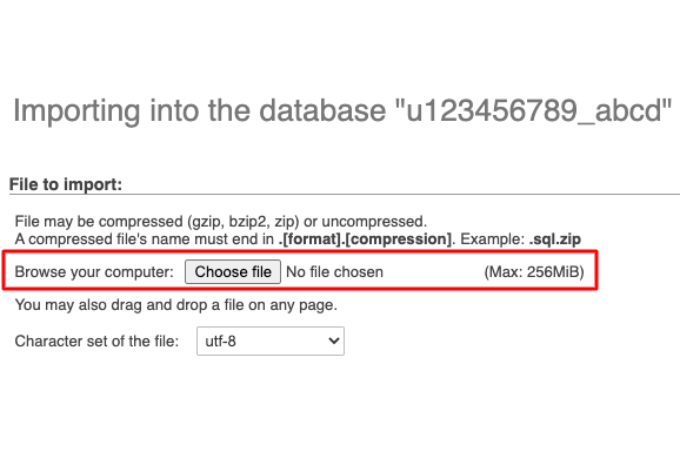
- Leave the defaults as-is unless your host instructs otherwise, then click Go to run the import.
Step 5: Configure CMS Settings
After transferring files and the database, point your site’s code to the new database. The exact steps depend on your CMS, but it usually means updating a few values in a configuration file.
For WordPress:
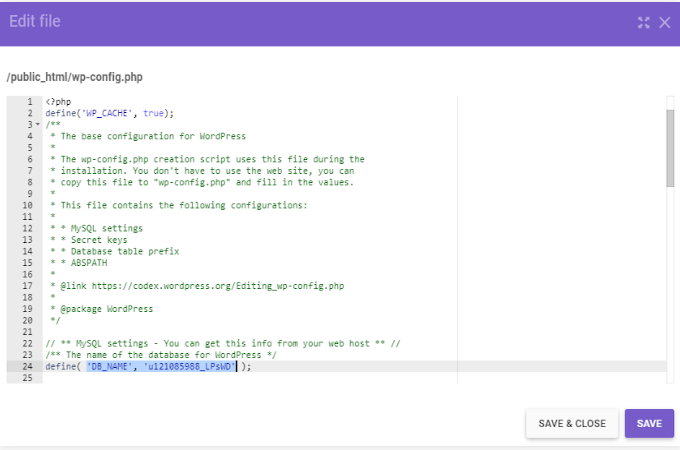
- Open
wp-config.php(often under Files > File Manager inpublic_html).
- Update the database constants—
DB_NAME,DB_USER,DB_PASSWORD, andDB_HOST—with your new database details. If your domain is changing, also update the site URL and home URL in the database or via the WordPress dashboard after DNS is updated.
Step 6: Transfer Any Custom Email Addresses
If you use custom addresses like info@skaccounting.com or jenny@skaccounting.com, recreate those mailboxes with your new host to avoid missed messages during the cutover.
Open your new host’s cPanel (or mail panel) and add the same email accounts you used before. Then, update your email client settings and confirm you can send and receive.
From the old host, note each mailbox’s email address, password, and inbound server (IMAP). If you manage email DNS separately (e.g., using your registrar’s DNS or a service like Google Workspace), be ready to update MX records and re-enable SPF/DKIM/DMARC on the new host.
Step 7: Update Your Domain Name System (DNS)
DNS connects your domain name to the correct server’s IP address so browsers know where to load your site. This is the final switchover step in your migration.
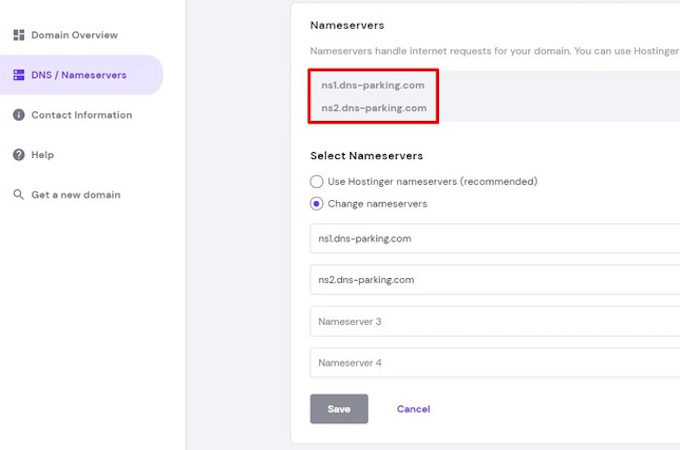
Your domain must now point to your new host’s nameservers (or records) instead of the old ones. Do this:
- Find your new host’s nameservers in your welcome email or account dashboard (e.g.,
ns1.host.comandns2.host.com).
- Log in to your domain registrar and open the domain’s nameserver settings (often under domain management). Replace the old nameservers with the new ones and save.
- In your new hosting account, confirm the nameservers are set as the default for your domain so traffic resolves to the new server.
Propagation usually completes within 24–48 hours (often much faster), though some networks can take up to 72 hours depending on TTL settings and ISP caching. Keep the old host active during this window to avoid downtime.
Step 8: Carry Out a Website Review
After DNS updates, verify that everything works on the new host. Even small issues can hurt user experience and SEO, so give the site a thorough check.
Visit your site at your domain and click through key pages, forms, and checkout flows. Test on desktop and mobile. Send test messages from your migrated email accounts. If you use a CDN, purge its cache. Re-issue or activate SSL if needed.
Perform a health check with a crawler such as Ahrefs’ Site Audit.
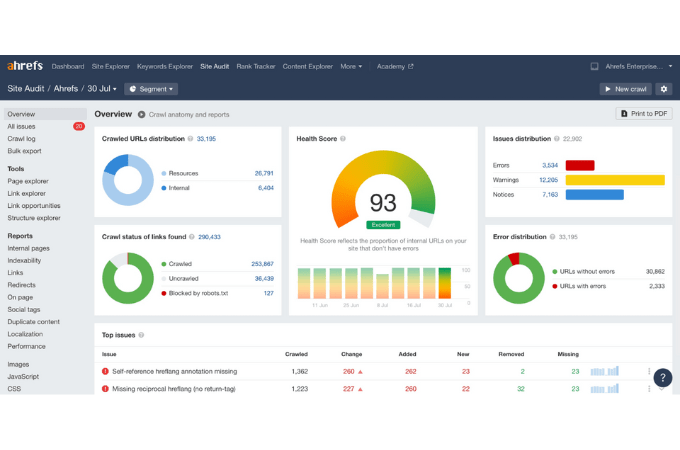
This will flag issues that may have appeared during the move, such as:
- Broken links and missing media
- Duplicate content or canonicalization problems
- 404s and server errors (4xx/5xx)
- Slow pages or Core Web Vitals regressions
- Internal linking gaps
- Meta/structured data or noindex/nofollow tagging mistakes
- CSS/JS loading issues and redirect chains
Final Thoughts About Migrating Your Website to a New Web Host
If you’re unhappy with your current host—or you’ve found a better fit—migrating to a new provider can immediately improve speed, reliability, and support. Choose a host with the right resources, security, and storage for your needs at a price you’re comfortable with. Many hosts offer migration tooling or services so you don’t have to do everything by hand. For example, Bluehost provides WordPress migration options that let you review the site before it goes live.
If you migrate manually, move your files and database, recreate custom email addresses, update configuration values, and switch DNS when you’re ready. Keep your old host active during propagation, then review the site thoroughly to catch any issues. A careful migration protects your user experience—and your search visibility—while setting your site up for faster growth on your new platform.