Technical problems can be scary to deal with, especially when you’re troubleshooting in unfamiliar territory. One of the error messages that’s particularly uninviting is the “too many redirects” page you’ll sometimes see on your browser.
The specific error displayed on your screen will depend on the browser you are using.
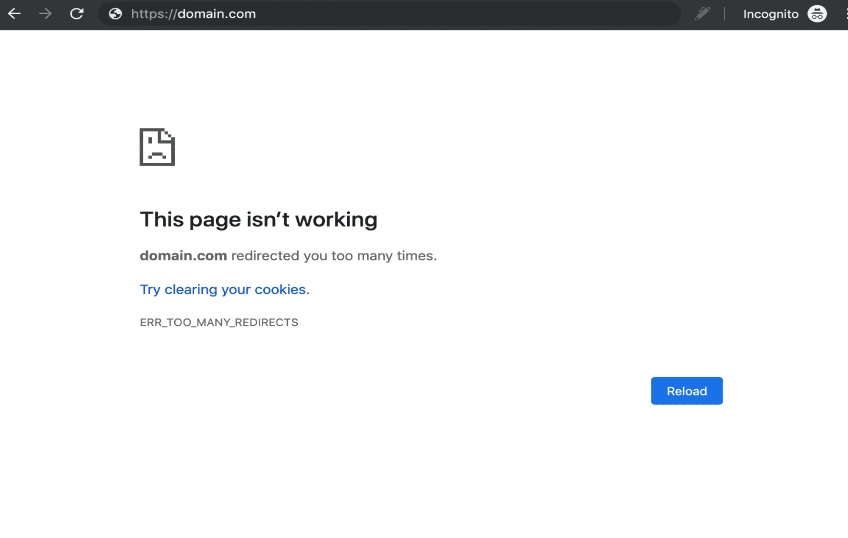
The ERR_TOO_MANY_REDIRECTS message often leaves users and site owners at a loss for what may have caused it. However, it may not be as confusing when you refer to the error by its other name, “the redirect loop,” which provides better clarity. Too many redirects suggest your browser is discombobulated from being thrown into an infinite redirect loop, and stopped the process as a result.
The malfunction has several possible root causes stemming from the website or server in one way or another. These potential causes include a misconfiguration of redirects, the wrong settings from a third party, and recent changes to the website your browser is trying to reach. It can also be caused by users disabling and/or refusing to accept cookies.
Whatever the cause, leaving this error unresolved will most likely degrade the user experience of your website visitors and cause your traffic to plummet.
That’s why it’s very important to know how to fix the ERR_TOO_MANY_REDIRECTS problem.
The Fastest Ways to Fix Too Many Redirects Errors
Several things can go wrong to trigger the too many redirects error, so the bulk of the challenge is identifying the redirect loop’s nature and root cause. That said, it’s not a bad idea to start blasting out the solutions for the most common problems. Some quick actions you can take include:
- Clearing or deleting your browser’s cache and cookies.
- Clearing the cache on your server, including third-party proxy services.
- Using a tool to determine the nature of the redirect loop.
- Checking plugins and third-party software settings, disabling them if necessary.
- Resolving misconfigurations by resetting the .htaccess file (Apache servers).
- Checking your HTTPS settings to ensure the secure sockets layer (SSL) is correctly installed.
- Checking the URL settings.
Naturally, the list of quick fixes is fairly long because there’s a constellation of factors that could be the reason for the error. The good news is that these guidelines for resolving the ERR_TOO_MANY_REDIRECTS problem are independent of any platform, operating system, content management system, or website builder.
Nevertheless, different web browsers and platforms may still have their own peculiar methods and respective navigation journeys to achieve these outcomes. In any case, this guide focuses on Google Chrome web browser the whole time to provide some uniformity.
Clear or Delete Cookies/Cache on Your Browser
Cookies are an ideal culprit for too many redirect errors because they are prone to faulty data that can trigger the error. Cookies try to improve user experience, for instance, by retaining a “logged in” status on the sites you’ve visited. However, this can cause problems when the information becomes outdated.
The good news is that clearing cookies and the cache is one of the easiest and most straightforward remedies to implement.
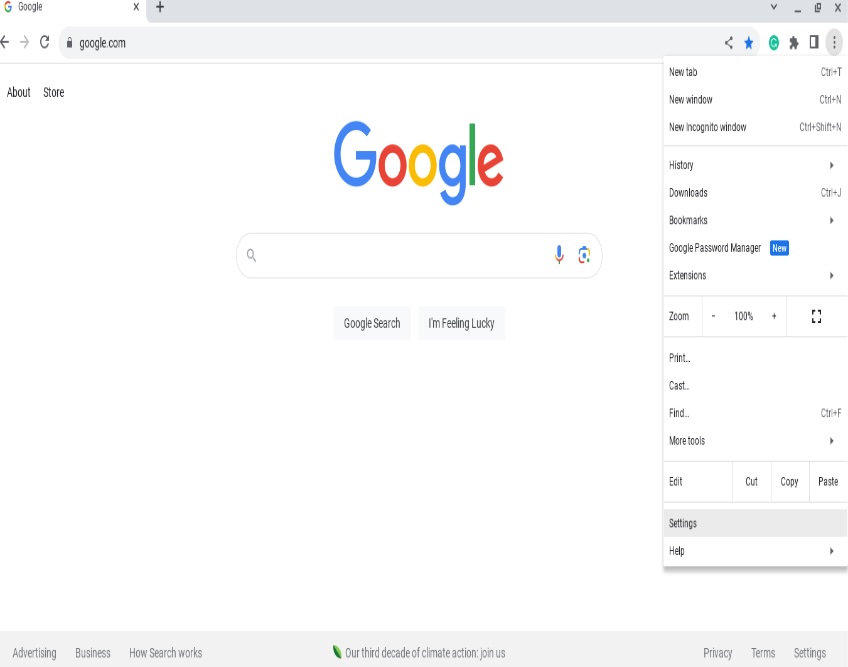
Step 1. On your Chrome browser, click the three small dots in the top right-hand corner to display a drop-down menu. Select the Settings option.
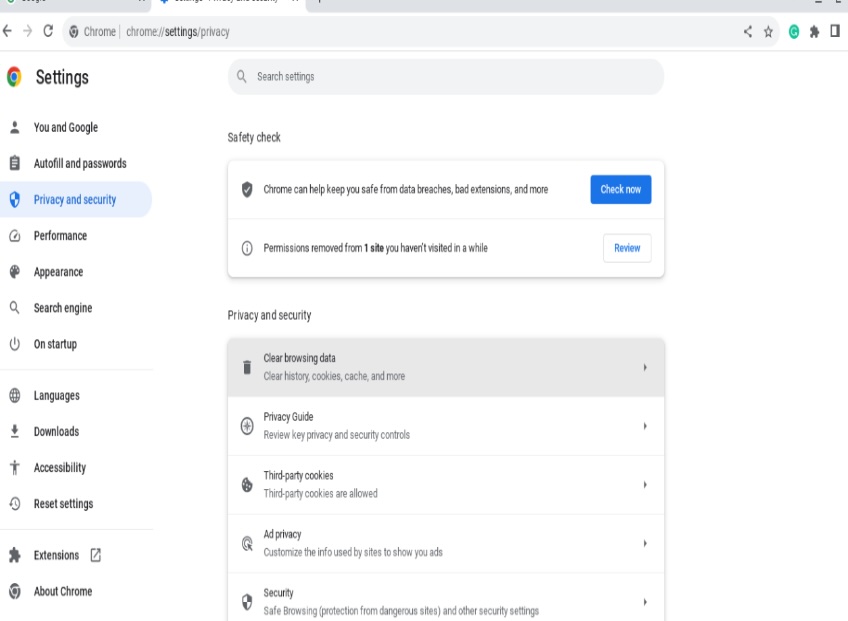
Step 2. Select Privacy and security from the sidebar on the left, and click the Clear browsing data section.
It’s worth noting that Chrome previously divided its cookies and cache settings into two distinct options, but now both are collapsed into the Clear browsing data option.
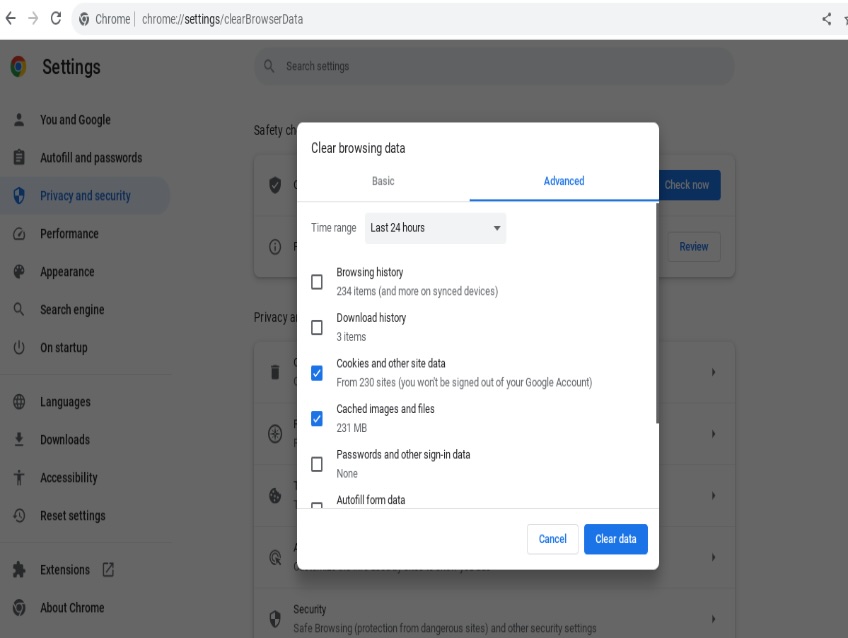
Step 3. On the Clear browsing data dialog box, you are provided with several options. The first is the time range, which allows you to select periods for the last hour, 24 hours, seven days, four weeks, and All time (no limit duration). We checked the boxes for Cookies and other site data, plus Cached images and files.
Cookies and cache problems are often birds of the same feather. We’ll focus exclusively on cached problems in the next segment. However, if you are troubleshooting redirects and you suspect it’s triggered by cookies, you should also target for cache issues while you’re at it.
Clear the Cache on Your Server
If clearing your cookies doesn’t resolve the infinite loop, the next logical step is to purge your server’s cache. This is vital because local browsers aren’t the only place where cache accumulates.
A cache stores information so your server doesn’t have to regenerate the same information each time it is requested. Cached information ultimately improves response times by reducing the querying, round trips, and computations an application needs to make.
While caching enables your site to load faster, it can cause a redirect loop if its information is outdated or erroneous.
Many content marketers host their sites on WordPress, so we’ll be looking at this redirect resolution from the perspective of its content management system (CMS). If you aren’t using WordPress, clearing the cache should be done on the server, web host, or other third-party proxy hosting your website.
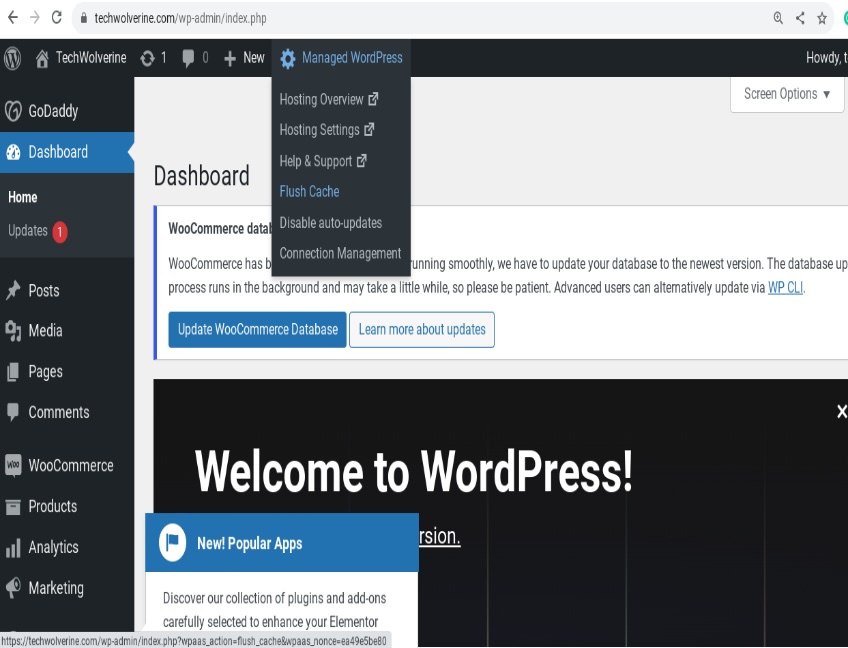
Step 1. After logging into your WP admin, go to its Dashboard. Your WordPress interface, dashboard, and the range of features it displays may differ depending on whether you are hosting WordPress as a managed service. Otherwise, it means you installed and are managing it yourself.
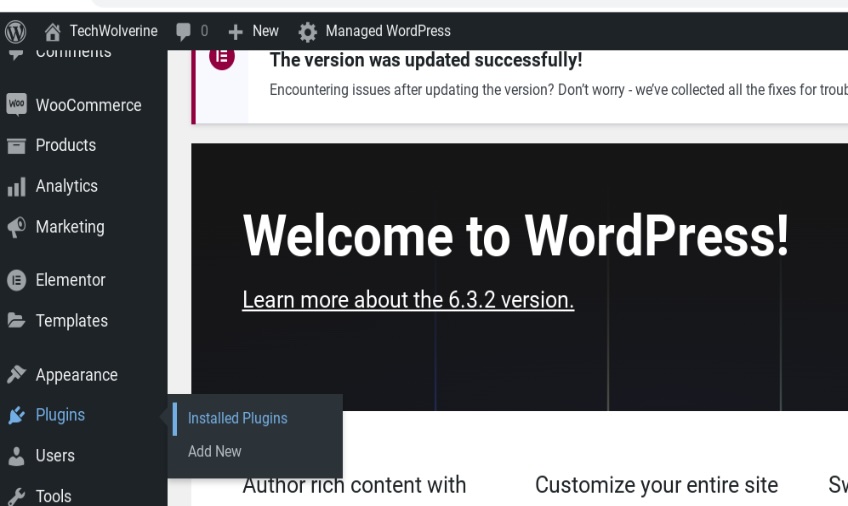
From the WordPress admin toolbar, select Flush Cache from the Managed WordPress drop-down menu.
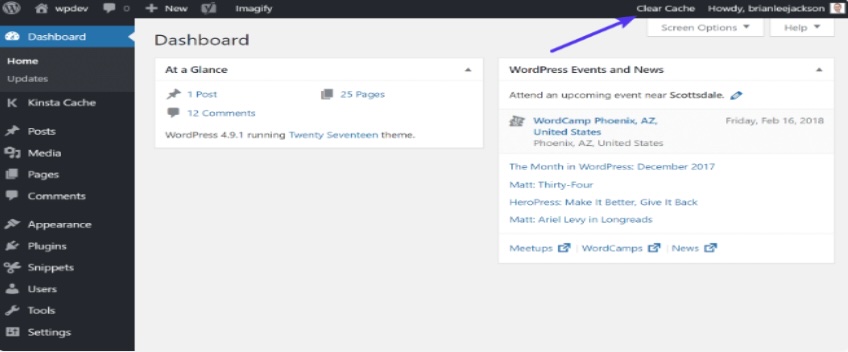
On the alternative, non-managed WordPress admin toolbar, you should find the Clear Cache option. Otherwise, select this functionality from the control panel of your web host platform.
Step 2. Once the server’s cache is cleared, you should receive a confirmation of the completed process.

It may take a while for the cleared cache to propagate, so give it some time. For good measure, restart the server (if possible) to see whether it will expedite the action.
Use Tools to Determine the Nature of a Redirect Loop
Deleting cookies and clearing the cache are low-hanging fruits in resolving the ERR_TOO_MANY_REDIRECTS. Fortunately, there are also tools available that can help you analyze why a large chain of faulty redirects is occurring.
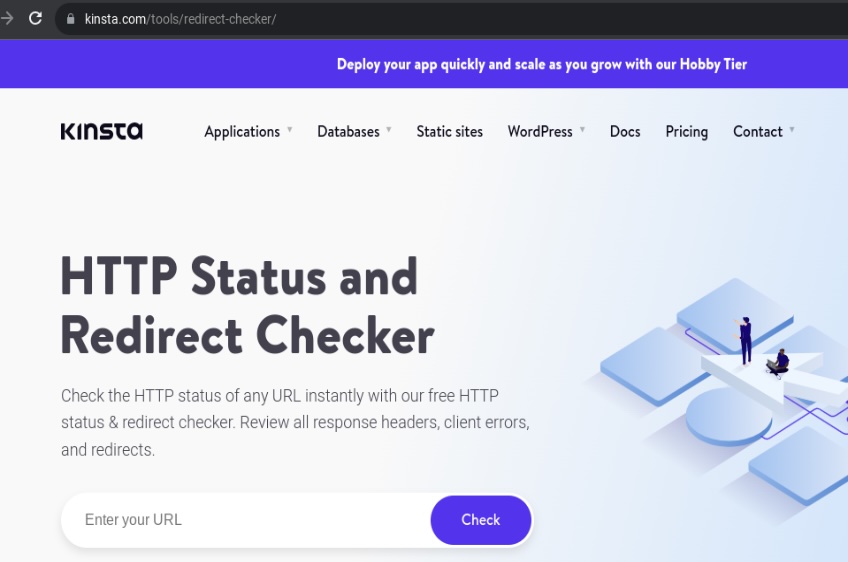
For instance, tools like Kinsta typically allow you to enter the URL of your website and generate results for free. Among other things, the output of these services consists of HTTP status codes that give you an indication of the proximate problems, such as a 301 redirect.
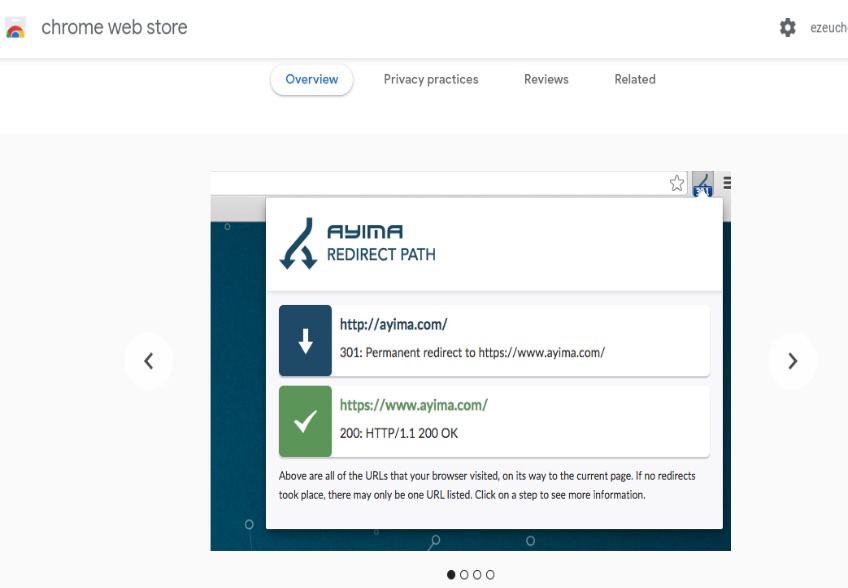
Another service that provides unique insights is Chrome’s Redirect Path extension. It flags redirects and errors for 301, 302, 404, and 500 HTTP status codes, including those triggered by client-side JavaScript.
These tools allow you to analyze the redirect paths to see how many redirects occur.
Check Plugins and Third-Party Software Settings
Third-party plugins can also lead to multiple redirects. This step is especially relevant if you are operating or running a WordPress site due to its abundance of third-party plugins that can trigger WordPress errors.
The beauty of plugins and third-party applications is that they prevent you from reinventing the wheel while providing many useful functionality and features for your website. However, as independent pieces of code, plugins and third-party software can introduce conflict and complexity to your website, causing it to malfunction unexpectedly.
Checking and evaluating plugins and settings allows you to troubleshoot and isolate the problematic application.
The best place to start is to disable all of your plugins and then re-enable them one at a time before refreshing the page and seeing if they are the culprit.
Step 1. From the admin dashboard, select Plugins > Installed Plugins
Step 2. Check the box beside Plugin to select all available plugins.
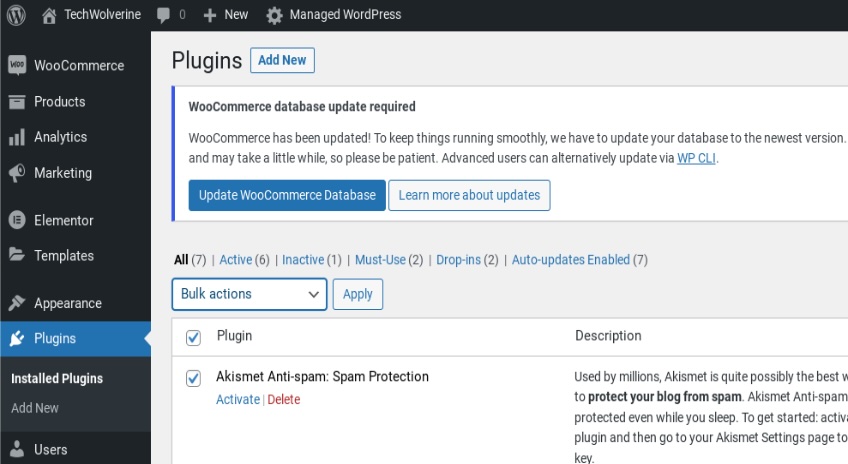
Step 3. From the Bulk actions drop-down box, select the Deactivate option. Once you have done that, click on the Apply button next to it.

Refresh your website and check whether it resolved the issue.
If so, then you can move on to test the plugins individually until you find the culprit.
Resolve Misconfigurations By Resetting the .htaccess File
Web administrators implement redirects, say, to prevent 404 errors. However, a poor misconfiguration can easily trigger a large chain of faulty redirects that go haywire. It’s even worse when a new redirection conflicts with a preexisting one.
To resolve it, or at least identify the bottleneck, you should trace the redirect to ascertain whether it’s looping back to itself.
If other resolution methods fail, the problem could be the hypertext access file (.htaccess). If misconfigured, it may improperly dictate how redirects are set up on the server. One way to resolve this is to reset your .htaccess file.
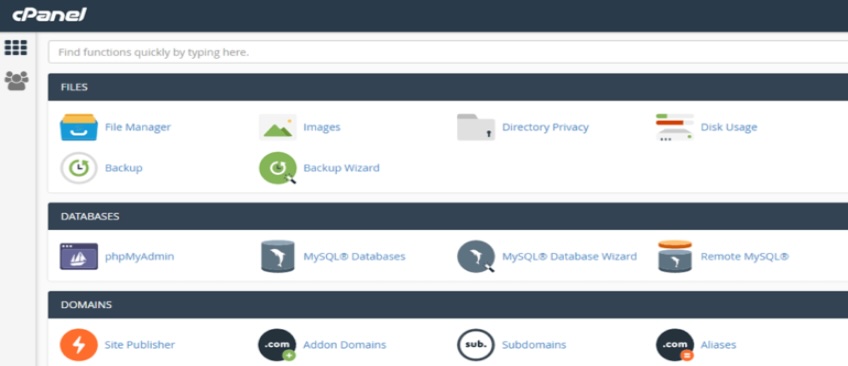
Step 1. Navigate to the File Manager application of your web host platform.
The steps to get here will depend on the navigation route or menu style of the platform. For example, if your host uses cPanel, you can easily launch the File Manager app from there.
Step 2. Once you have launched File Manager, navigate to the root directory folder of your web server.
The root directory typically goes under names like www, htdocs, httpdocs, or public_html. That said, don’t be alarmed if you find a unique nomenclature instead.
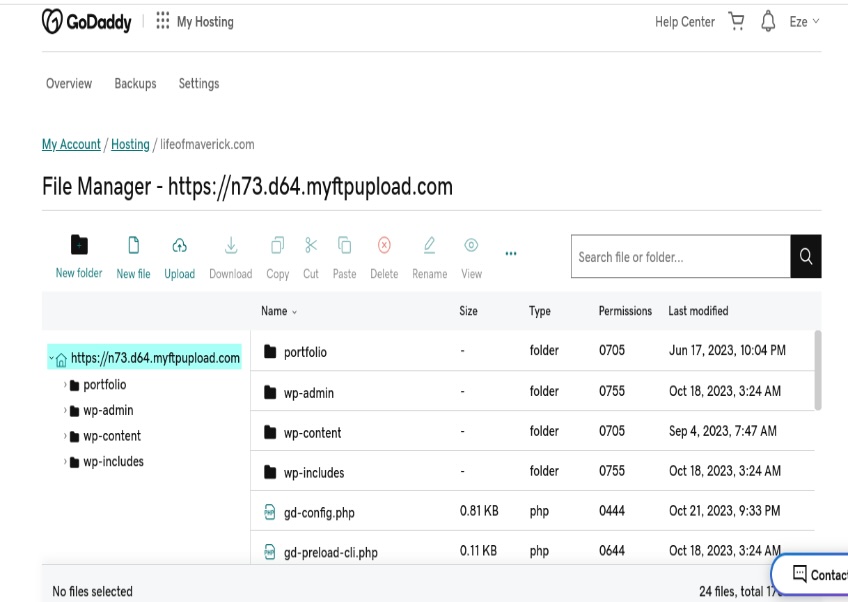
Step 3. Locate the .htaccess file. If you can’t find it, make sure you enable the “show hidden files” properties on the folder. Once you’ve located it, rename it or copy it to create a backup. This will enable you to revert to the original copy if necessary.
Right-click to open it.

Step 4. Copy and paste the following code into the .htaccess file.
<IfModule mod_rewrite.c>
RewriteEngine On
RewriteBase /
RewriteRule ^index\.php$ - [L]
RewriteCond %{REQUEST_FILENAME} !-f
RewriteCond %{REQUEST_FILENAME} !-d
RewriteRule . /index.php [L]
</IfModule>
Step 5. Save the file, exit the File Manager, and refresh your site.
If the source of the redirect error stems from misconfiguration, then this approach should resolve the problem. If all else fails, contact your web hosting provider’s technical support.
Check HTTPS Settings to Ensure SSL Is Correctly Installed
Conflicts with SSL certificates and incorrect HTTPS settings are fertile ground for ERR_TOO_MANY_REDIRECTS problems.
HTTP to HTTPS redirects are another culprit to be scrutinized. This usually occurs when a site’s migration to HTTPS is poorly or incompletely implemented. For instance, if you have an existing SSL certificate but a third-party service you’ve incorporated into your toolchain uses Flexible SSL, it can create too many redirect issues.
Remember, don’t try to force a website to load HTTPS without initially installing an SSL certificate.
Check the URL Settings
When a website points to a wrong or invalid domain, it can trigger an ERR_TOO_MANY_REDIRECTS message. This can occur during a domain change or host migration.
Step 1. From the WordPress admin bar, select Settings > General.

Step 2. Here, you need to focus on two main fields:
- WordPress Address (URL), which specifies where your site’s WP files are located.
- Site Address (URL), which specifies your website’s homepage, the one that’s publicly available for all users.
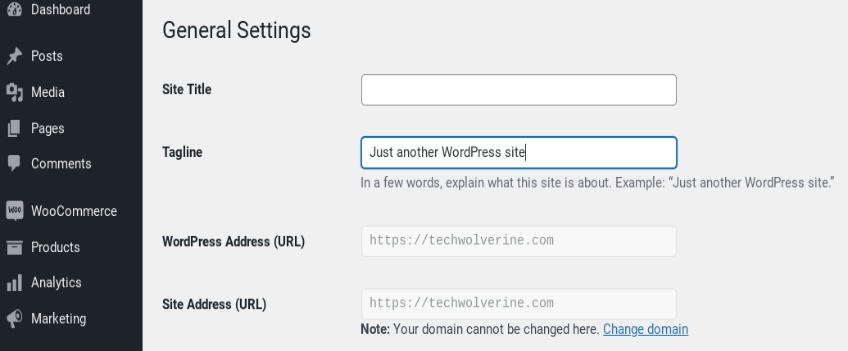
Usually, both of these addresses should match each other.
Step 3. Ensure the entries in the two fields pass the following checks:
- There are no whitespaces at the end of the URL field
- The URL field doesn’t start with www, but instead starts with a protocol such as https://
Therefore, your URL field should look like https://domain.com instead of https://www.domain.com . (The www and the extra space at the end of the second URL are to be avoided.)