WordPress widgets are a fast, flexible way to add useful features to your site without modifying core files. You can surface text, CTAs, social feeds, banners, menus, search, or almost any custom feature in sidebars, footers, and other widget-ready areas—directly from the Widgets screen or Site Editor.
Under the hood, a classic widget is a small PHP class that runs predefined functionality and can be added via the block-based Widgets screen (WordPress 5.8+) in classic themes, or placed in block themes via the Legacy Widget block in the Site Editor. Where you can place widgets depends on your active theme and its registered widget areas or template parts. If you prefer the old Widgets interface, you can restore it with the official Classic Widgets plugin.
Bottom line—they’re awesome.
Sometimes the built-in widgets are enough. Other times, you’ll want a widget that behaves differently, matches your brand, or exposes custom data from your site or an API.
That’s where custom WordPress widgets come in. You can build them from scratch, package them as a standalone plugin so they survive theme changes, or even offer a modern block version for the Site Editor.
Even better? Creating your own widget is easier than you might expect—and you’ll future-proof it with a few best practices below.
4 Steps to Build a Custom WordPress Widget
Here’s an overview of what you’ll do:
- Understand How WordPress Widgets Work
- Create a Plugin to Hold Your Widget Code
- Code Your Custom Widget
- Activate and Preview Your Widget on Your Site
What to Expect When Creating a WordPress Widget
If WordPress and PHP feel intimidating, you’re not alone. Mixing the two can sound complex—but broken into steps, it’s very approachable.
With a basic understanding of WordPress, PHP, and a bit of HTML/CSS, you can build a fully functioning, secure widget that fits your site’s design.
The Good
You can create a WordPress widget using one of two methods:
- Edit the
functions.phpfile directly (quick, but tied to your current theme) - Create a standalone plugin with your widget code (recommended—portable and safer)
If one approach doesn’t suit your workflow, switch to the other. Build and test in a local or staging environment first, then deploy to production.
Custom widgets are incredibly flexible. Use them to surface promos, testimonials, forms, product lists, related posts, or interactive elements. If your theme’s default widgets come up short, a custom widget fills the gap.
Because you build it, you control everything—markup, styles, data sources, and exactly where it appears.
The Challenges
Plan before you code. What problem does the widget solve? What inputs/settings are needed? Which widget areas will display it? A short plan up front prevents rework later.
Think ahead. Even if you’re new to development, designing for future changes (copy, styling, layout) saves time and avoids refactors.
You don’t need to be a senior engineer, but you should be comfortable with object-oriented PHP, WordPress hooks, escaping/sanitization, and the Widgets or Site Editor workflows.
Step 1 – Understand How WordPress Widgets Work
One reason WordPress powers so much of the web is its flexibility. Nearly every major WordPress hosting provider supports WordPress-specific features because it’s developer-friendly, SEO-capable, and endlessly customizable.
Classic widgets are classes that extend WP_Widget and render inside registered widget areas. Since WordPress 5.8, the Widgets screen uses the block editor in classic themes, and legacy widgets still work via the “Legacy Widget” block—so your custom widget remains compatible in both classic and block themes. If you’re using a block theme, you’ll manage placement from Appearance > Editor (the Site Editor), not the Customizer or the old Widgets screen.
The WP_Widget base class exposes many methods, but you only need four to ship a production-ready widget:
- __construct() – Registers the widget (name, ID, description, options) for the admin.
- widget() – Outputs the front-end HTML.
- form() – Renders the widget’s settings form in the dashboard.
- update() – Validates and saves settings.
You can extend functionality with additional logic, but these four are your foundation.
Create a WordPress Backup
Before writing code, I recommend taking a full backup via your host or a backup plugin, and working in a staging or local environment. If you must modify theme files, use a child theme to protect customizations during updates.
(Optional) Register a Widget Area
If your classic theme doesn’t expose a sidebar/footer widget area, register one in your theme or plugin. Block themes typically define these areas as template parts you edit in the Site Editor.
<?php
 add_action( 'widgets_init', function () {
   register_sidebar( array(
     'name'           => __( 'Primary Sidebar', 'text_domain' ),
     'id'             => 'primary-sidebar',
     'before_widget' => '<section id="%1$s" class="widget %2$s">',
     'after_widget'  => '</section>',
     'before_title'  => '<h2 class="widget-title">',
     'after_title'   => '</h2>',
   ) );
 } );
 ?>
Step 2 – Create a Plugin to Hold Your Widget Code
You have two options when adding a custom widget to WordPress:
- Create a standalone plugin and add your widget code inside it (best long-term choice)
- Paste the code directly into your theme’s
functions.phpfile (fast, but theme-dependent)
Building a plugin keeps your code portable and separate from your theme, so switching themes won’t break your widget.
Pro Tip: I recommend building and testing locally or on staging before touching your live site. Version-control your code for easy rollbacks.
Now, I’ll walk you through creating the plugin.
Install a Text Editor
Use a modern code editor with PHP linting and Git support. Visual Studio Code is excellent on Windows, macOS, and Linux. Sublime Text and Nova (macOS) are also solid choices.
Create the Plugin Folder and File
In your WordPress directory, open wp-content/plugins. Create a new folder—e.g., widget-plugin.
Inside it, create widget-plugin.php and open it in your editor.
Use a dedicated folder per plugin—even for single-file plugins—to keep things organized.
Add the Plugin Header
At the top of widget-plugin.php, add this metadata block so WordPress can detect and list your plugin:
<?php
 /*
 Plugin Name: My Widget Plugin
 Plugin URI: https://www.example.com/my-widget-plugin
 Description: Adds a custom widget to your site.
 Version: 1.0.0
 Author: Your Name
 Author URI: https://www.example.com
 License: GPL2
 Text Domain: my-widget-plugin
 Requires at least: 6.0
 Requires PHP: 8.0
 */
 ?>
Customize fields like Plugin Name and Author for your project. Save the file. (Most modern hosts support PHP 8.x—if you can, I recommend targeting PHP 8.2+ for performance and long-term support.)
Check That WordPress Recognizes the Plugin
In the WordPress admin, go to Plugins. You should see “My Widget Plugin.” Click Activate.
If it doesn’t appear, verify the folder/file names and that your header comment is valid PHP (no stray characters before <?php).
Step 3 – Code the Widget in WordPress
Now for the fun part—building the widget class. You’ll define a class that extends WP_Widget and implement four methods: __construct(), form(), update(), and widget().
Here’s a clean, modern skeleton you can paste into your plugin file below the header:
 class My_Custom_Widget extends WP_Widget {
   public function __construct() {
     parent::__construct(
       'my_custom_widget',
       __( 'My Custom Widget', 'my-widget-plugin' ),
       array(
         'classname' => 'my_custom_widget',
         'description' => __( 'Displays a custom title and message with optional controls.', 'my-widget-plugin' ),
         'customize_selective_refresh' => true,
       )
     );
   }

   public function form( $instance ) {
     $title    = isset( $instance['title'] ) > esc_attr( $instance['title'] ) : '';
     $text     = isset( $instance['text'] ) > esc_attr( $instance['text'] ) : '';
     $textarea = isset( $instance['textarea'] ) > esc_textarea( $instance['textarea'] ) : '';
     $checkbox = ! empty( $instance['checkbox'] );
     $select  = isset( $instance['select'] ) > esc_attr( $instance['select'] ) : '';

     ?>
     <p>
       <label for="<?php echo $this->get_field_id( 'title' ); ?>"><?php _e( 'Title:', 'my-widget-plugin' ); ?></label>
       <input class="widefat" id="<?php echo $this->get_field_id( 'title' ); ?>" name="<?php echo $this->get_field_name( 'title' ); ?>" type="text" value="<?php echo $title; ?>">
     </p>

     <p>
       <label for="<?php echo $this->get_field_id( 'text' ); ?>"><?php _e( 'Custom message:', 'my-widget-plugin' ); ?></label>
       <input class="widefat" id="<?php echo $this->get_field_id( 'text' ); ?>" name="<?php echo $this->get_field_name( 'text' ); ?>" type="text" value="<?php echo $text; ?>">
     </p>

     <p>
       <label for="<?php echo $this->get_field_id( 'textarea' ); ?>"><?php _e( 'Additional HTML (allowed tags):', 'my-widget-plugin' ); ?></label>
       <textarea class="widefat" rows="4" id="<?php echo $this->get_field_id( 'textarea' ); ?>" name="<?php echo $this->get_field_name( 'textarea' ); ?>"><?php echo $textarea; ?></textarea>
     </p>

     <p>
       <input class="checkbox" type="checkbox" <?php checked( $checkbox ); ?> id="<?php echo $this->get_field_id( 'checkbox' ); ?>" name="<?php echo $this->get_field_name( 'checkbox' ); ?>">
       <label for="<?php echo $this->get_field_id( 'checkbox' ); ?>"><?php _e( 'Show extra note', 'my-widget-plugin' ); ?></label>
     </p>

     <p>
       <label for="<?php echo $this->get_field_id( 'select' ); ?>"><?php _e( 'Layout:', 'my-widget-plugin' ); ?></label>
       <select class="widefat" id="<?php echo $this->get_field_id( 'select' ); ?>" name="<?php echo $this->get_field_name( 'select' ); ?>">
         <option value="" <?php selected( $select, '' ); ?>><?php _e( 'Default', 'my-widget-plugin' ); ?></option>
         <option value="compact" <?php selected( $select, 'compact' ); ?>><?php _e( 'Compact', 'my-widget-plugin' ); ?></option>
         <option value="wide" <?php selected( $select, 'wide' ); ?>><?php _e( 'Wide', 'my-widget-plugin' ); ?></option>
       </select>
     </p>
     <?php
   }

   public function update( $new_instance, $old_instance ) {
     $instance = $old_instance;
     $instance['title']   = isset( $new_instance['title'] ) > wp_strip_all_tags( $new_instance['title'] ) : '';
     $instance['text']    = isset( $new_instance['text'] ) > wp_strip_all_tags( $new_instance['text'] ) : '';
     $instance['textarea'] = isset( $new_instance['textarea'] ) > wp_kses_post( $new_instance['textarea'] ) : '';
     $instance['checkbox'] = ! empty( $new_instance['checkbox'] ) > 1 : 0;
     $instance['select']   = isset( $new_instance['select'] ) > wp_strip_all_tags( $new_instance['select'] ) : '';
     return $instance;
   }

   public function widget( $args, $instance ) {
     $title    = apply_filters( 'widget_title', $instance['title'] ?? '' );
     $text     = $instance['text'] ?? '';
     $textarea = $instance['textarea'] ?? '';
     $select  = $instance['select'] ?? '';
     $checkbox = ! empty( $instance['checkbox'] );

     echo $args['before_widget'];
     if ( $title ) {
       echo $args['before_title'] . esc_html( $title ) . $args['after_title'];
     }

     if ( $text ) {
       echo '<p>' . esc_html( $text ) . '</p>';
     }

     if ( $textarea ) {
       echo '<div class="widget-textarea' . ( $select > ' layout-' . esc_attr( $select ) : '' ) . '">' . wp_kses_post( $textarea ) . '</div>';
     }

     if ( $checkbox ) {
       echo '<p class="widget-note">' . esc_html__( 'Something awesome', 'my-widget-plugin' ) . '</p>';
     }

     echo $args['after_widget'];
   }
 }

 function my_register_custom_widget() {
   register_widget( 'My_Custom_Widget' );
 }
 add_action( 'widgets_init', 'my_register_custom_widget' );
This version avoids extract() (discouraged), uses proper escaping/sanitization, and supports selective refresh in the Customizer for classic themes. (Block themes typically hide the Customizer and use the Site Editor instead.)
Element #1: __construct()
The constructor registers your widget with a unique ID, a human-readable name, and options. The customize_selective_refresh flag improves the Customizer experience in classic themes. Use __()/_e() for translation.
Element #2: form()
Build the admin settings UI with get_field_id() and get_field_name() so WordPress can save your inputs reliably. Escape fields with esc_attr() or esc_textarea() when rendering the form.
Sanitize on save (in update()) and escape on output (in widget()). This two-step pattern keeps your widget safe and stable.
Element #3: update()
Validate and sanitize all fields before saving. Use wp_strip_all_tags() for plain text, wp_kses_post() for limited HTML, and cast checkboxes to 0/1.
Element #4: widget()
Render the front-end HTML. Use the $args wrappers (before_widget, after_widget, before_title, after_title) to match the active theme’s styles. Escape output (esc_html) and allow safe HTML with wp_kses_post where appropriate.
Optional: Offer a Block Version Too
If your site uses a block theme or you want a modern editing experience, register a server-side rendered block that reuses your widget’s output logic:
 // Minimal example inside your plugin
 add_action( 'init', function () {
   register_block_type( 'my-namespace/my-widget', array(
     'render_callback' => function( $attributes ) {
       ob_start();
       // Reuse or call your widget’s rendering function here.
       echo '<div class="my-widget-block">Hello from a block!</div>';
       return ob_get_clean();
     }
   ));
 } );
This gives editors a block they can place anywhere in the Site Editor while preserving your server-side PHP rendering.
Step 4 – Test and Display Your Widget
After coding, it’s time to test on your site.
Add the Widget to a Sidebar (Classic Themes)
In your dashboard, go to Appearance > Widgets. You should see My Custom Widget (or your widget’s name) in the available widgets. Drag it into a sidebar or other widget-ready area. If you don’t see the Widgets screen at all, you’re likely using a block theme—use the Site Editor instructions below.
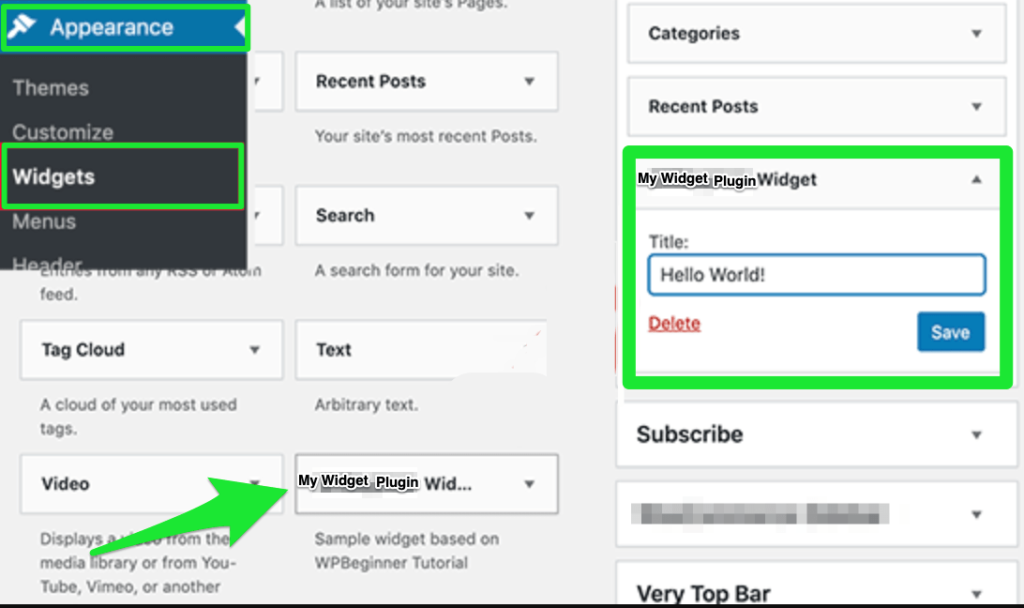
Use the Site Editor (Block Themes)
For block themes, open Appearance > Editor and edit the template or template part that contains your sidebar or footer. Insert a Legacy Widget block to add your classic widget—or insert your custom block if you registered one.
Fill Out the Form Fields
Enter the widget’s title, message, and any optional fields, then click Save. Visit the front end to confirm it renders as expected.
Pro Tip: If something looks off, check your PHP error logs for syntax or fatal errors, verify that your theme has a registered widget area (or appropriate template part), and enqueue minimal CSS in your theme or plugin stylesheet to align visuals with your brand.
Troubleshooting Quick Wins
- Widget not showing? Confirm the widget area is active on the template you’re viewing (or that your block theme’s template part includes it).
- Styles not loading? Enqueue CSS via your plugin and scope classes to avoid conflicts.
- Site Editor only? Use a block version (server-rendered) or the “Legacy Widget” block.
- Validation issues? Escape output in
widget()and sanitize data inupdate().
Final Tips: Make Your Widget Helpful, Accessible, and SEO-Friendly
Shipping a working widget is great—making it genuinely helpful is better. Prioritize usability, accessibility, performance, and clarity so your pages serve real users (and satisfy search engines).
1. Prioritize User Intent
Why does this widget exist? What question does it answer or action does it drive? If it doesn’t increase clarity, navigation, or engagement, it’s clutter—trim it or rethink it.
Pages that meet clear user needs tend to perform better. Ensure your widget complements the main content rather than distracting from it.
2. Use Semantic HTML and ARIA Labels
Wrap content with meaningful tags like <aside> for sidebars and ensure interactive elements have accessible names. Add ARIA roles/labels (e.g., role="button", aria-label) to support screen readers and meet WCAG guidelines.
3. Avoid Heavy Scripts and Inline Styles
Every extra kilobyte affects LCP and INP metrics. Enqueue scripts/styles properly from your plugin and load them conditionally (only when the widget is active).
If you need interactivity, prefer small, dependency-free scripts or lean on core WordPress features.
4. Make It Mobile Responsive
Most traffic is mobile. Use flexible layouts (flexbox or grid), responsive units (em/rem/%), and sufficient tap targets. Test in the browser’s responsive mode and a real device when possible.
5. Add Structured Data If Applicable
If your widget surfaces reviews, products, events, or FAQs, consider adding JSON-LD schema (e.g., FAQPage, Product, Event) to help search engines understand the content and potentially unlock rich results.
Only add schema when the on-page content supports it. Keep it accurate and consistent with what users see.
6. Keep It Simple and Maintainable
Aim for focused functionality, readable code, and clear comments. If you’ll build multiple widgets, centralize shared helpers in one plugin and reuse styles/components.
Wrapping Up
Custom widgets are a practical way to make your site more dynamic and user-centric. With a small PHP class, core WordPress APIs, and a bit of CSS, you can ship polished features that fit your theme and support your content strategy.
Focus on helpfulness, performance, and accessibility—you’ll create widgets that users love and editors enjoy placing in the right context.
Once your first widget is live, consider offering a block version too. Or go bigger and build a small plugin suite that you—or the wider WordPress community—can rely on.