Changing your WordPress username isn’t straightforward—WordPress core doesn’t let you edit the username field in your profile. That’s intentional because the username is a unique identifier used across your database and login system. If you force it the wrong way, you can trigger login errors or get locked out of your admin dashboard.
Still, there are valid reasons to switch to a new username:
- Your login credentials were exposed or compromised
- You inherited the website from another owner
- Your current username includes personal or outdated info
- The associated email address is no longer accessible
No matter the reason, here are three reliable ways to change your WordPress username—from beginner-friendly to advanced—plus optional cleanup steps and pro tips.
Important: Back Up First
Before you touch anything, back up your website (files + database).
Even if you’re just updating user data, things can go sideways. If you’re locked out and don’t have a proper backup, restoring access is a headache. Take a full backup that includes the wp_users and wp_usermeta tables.
Use a plugin like UpdraftPlus to create a complete backup, or use your host’s snapshot feature if available. Creating a quick staging copy first is an even safer bet.
Method 1: Beginner-Friendly – Create a New Admin User
This is the safest, most foolproof approach. You’ll create a new user with your preferred username, verify access, attribute content to the new user, then remove the old one.
Step 1: Add a New User
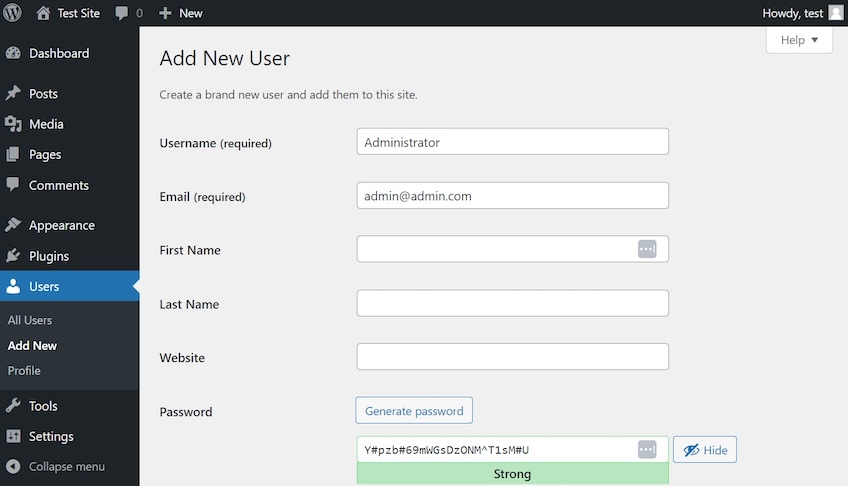
- Log into your WordPress dashboard.
- Go to Users > Add New.
- Fill in the username, email, and password for your new user (avoid using “admin” or your email as a username).
- Under Role, choose Administrator.
- Click Add New User.
Tip: Use a valid, accessible email address—this is critical for password recovery, two-factor authentication, and site notifications.
Step 2: Log Into the New Account
Log out and sign back in using your new admin account. Confirm you can reach key areas (Users, Plugins, Settings) and the front end of your site.
Step 3: Delete the Old User
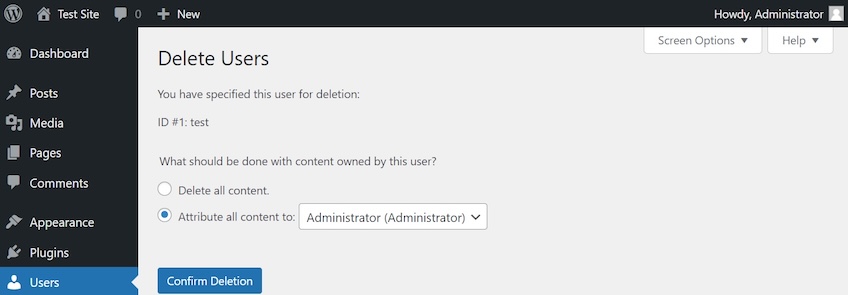
- Go to Users > All Users.
- Find your old account and click Delete.
- When prompted, choose “Attribute all content to [new user]”—this transfers posts, pages, and media to your new account.
- Confirm the deletion.
That’s it. You’ve effectively changed your WordPress username with minimal risk and no lost content.
Method 2: Intermediate – Use a Plugin Like Easy Username Updater
If you prefer not to create and delete users, the Easy Username Updater plugin offers a quick, safe solution.
Step 1: Install the Plugin
- Go to Plugins > Add New.
- Search for Easy Username Updater.
- Click Install Now > Activate.
Step 2: Update Your Username
- Go to Users > Username Updater.
- Find your user account and click Update.
- Enter your new username and click Save Changes.
The plugin updates your username without affecting your password, content, or current session. When you’re done, you can deactivate and delete the plugin.
Method 3: Advanced – Change Username in phpMyAdmin
If you’re comfortable working directly with databases and your hosting provider offers phpMyAdmin, this is a direct route—just proceed with caution.
Warning:
- Back up your site and database first.
- Log out of WordPress before editing the user table to avoid session issues.
- Don’t try to set passwords in plain text—WordPress stores them as hashes.
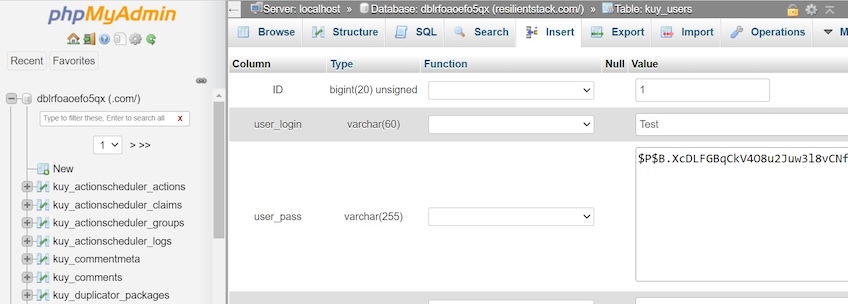
Step 1: Access phpMyAdmin
Log into your hosting control panel (e.g., cPanel or Site Tools). Open phpMyAdmin and select your site’s database.
Step 2: Locate the Users Table
In the sidebar, find the table named wp_users (or [prefix]_users if you’re using a custom prefix).
- Click the table.
- Find your current username.
- Click Edit.
Step 3: Change the Username
- In the
user_loginfield, enter your new desired username (optionally updateuser_nicenameto match if you want the author URL to change too). - Scroll down and click Go or Save.
You can now log in using your new username.
Alternatively, advanced users can run this SQL query (adjust the table prefix and ID):
UPDATE wp_users SET user_login = 'newusername', user_nicename = 'newusername' WHERE ID = 123;Replace wp_users, newusername, and 123 with your actual table prefix, desired username, and user ID.
Optional: Just Change the Display Name Instead
If your goal is simply to update how your name appears on posts, you don’t need to change your login.
- Go to Users > Profile.
- Scroll to the Name section.
- Enter a Nickname and choose it under Display name publicly as.
- Click Update Profile.
This updates the public-facing byline on posts and comments without altering your login credentials.
Optional: Update Your Author URL (Slug)
If your site uses author archive pages (e.g., /author/username/), changing the login alone won’t update that URL. To change the author slug safely, use a dedicated plugin (for example, “Edit Author Slug”) or update the user_nicename field as noted above, then add a redirect from the old author URL to the new one.
Common Mistakes to Avoid
Changing your WordPress username can be straightforward—if you avoid these pitfalls:
Using a Fake Email
Without a working email, you won’t be able to reset your password or receive security alerts. Always use a real, accessible email address for every admin account.
Ignoring Plugin or SSO Conflicts
Some plugins—like Google/Microsoft “Sign in” add-ons, corporate SSO, or Jetpack’s WordPress.com Secure Sign On—modify how logins work. Make sure those don’t override or conflict with your changes.
Forgetting About WordPress.com Logins
If you created your site through WordPress.com or use Jetpack’s WordPress.com Secure Sign On, manage connected logins from your WordPress.com dashboard.
Expecting WP-CLI to Change Usernames
WP-CLI can create and update users, but it won’t change the user_login field. Use the new-user method, a plugin, or the database approach instead.
Making Typos in phpMyAdmin
One wrong character in your database can break your login. If you’re editing the database manually, double-check the table prefix, user ID, and fields before saving.
Using “admin” or Your Email as a Username
These are easy to guess and commonly targeted. Choose something unique and non-identifying.
Skipping Two-Factor Authentication
Changing a username improves security, but 2FA does the heavy lifting. Enable two-factor authentication on all admin accounts. If you want passwordless options like passkeys, add a reputable security plugin that supports them.
Not Clearing Cache or CDN
After changes, clear any plugin cache and your CDN cache so author pages and bylines update everywhere.
Multisite Gotchas
On WordPress Multisite, only a Super Admin can manage network-wide users. Make changes from the Network Admin to keep roles and access consistent.
Pro Tips for Better User Management
- Keep only one active Administrator account per person.
- Use long, unique passwords and enable two-factor authentication (consider adding passkeys via a security plugin).
- Limit user roles to the minimum required permissions.
- Remove old or unused accounts to reduce attack surfaces.
- Use a secure, non-identifying username (avoid names that reveal your email or brand role).
- After changes, review author pages, bylines, and any API/app passwords tied to the old user (including Application Passwords), and rotate anything still linked.
Final Thoughts
Changing your WordPress username isn’t something you’ll do often—but when you do, choose the safest path for your skill level. Whether you create a new admin, use a trusted plugin, or update the database directly, always make a full backup first and verify the results on the front end.
And if your only concern is how your name appears publicly, a quick display name or author slug update is all you need—no username change required.