Changing your WordPress username isn’t exactly straightforward—WordPress doesn’t offer a native feature for it. That’s because modifying a username can lead to complications like login errors or being locked out of your admin dashboard.
Still, there are valid reasons to want a new username:
- Your login credentials were exposed or compromised
- You inherited the website from another owner
- Your current username includes personal or outdated info
- The associated email address is no longer accessible
No matter the reason, we’ll walk you through three reliable ways to change your WordPress username—from beginner-friendly to more advanced approaches.
Important: Back Up First
Before you touch anything, back up your website.
Even if you’re just updating user data, things can go sideways. If you’re locked out of your account and don’t have a proper backup, restoring access can be a pain.
Use a plugin like UpdraftPlus to create a full backup of your site, including the database and user tables.
Method 1: Beginner-Friendly – Create a New Admin User
This is the safest and most foolproof method. You’ll create a new user with your preferred username, transfer content, and then delete the old user.
Step 1: Add a New User
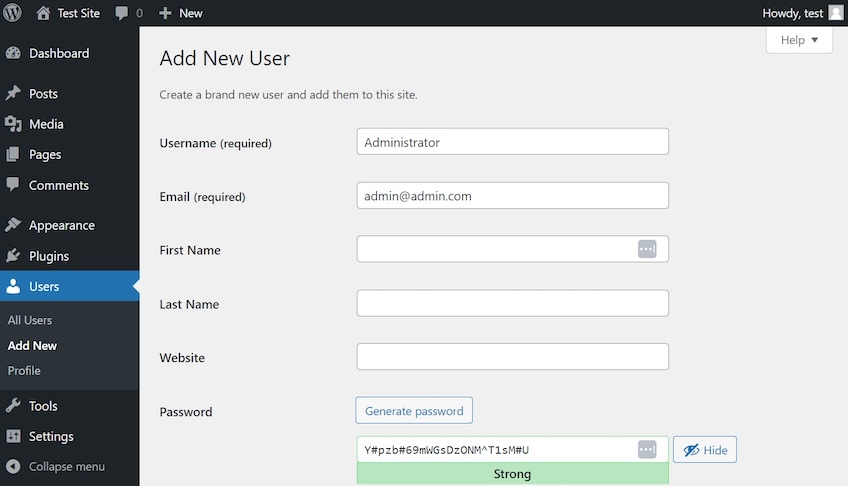
- Log into your WordPress dashboard.
- Go to Users > Add New.
- Fill in the username, email, and password for your new user.
- Under Role, choose Administrator.
- Click Add New User.
Tip: Use a valid email address—this is critical for password recovery and site notifications.
Step 2: Log Into the New Account
Now log out and sign back in using your new admin account. This step confirms that everything is working before deleting your old account.
Step 3: Delete the Old User
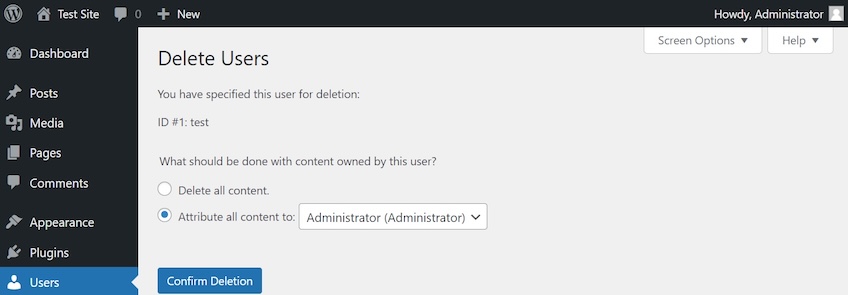
- Go to Users > All Users.
- Find your old account and click Delete.
- When prompted, choose “Attribute all content to [new user]”—this transfers posts, pages, and media to your new account.
- Confirm the deletion.
That’s it! You’ve now effectively changed your WordPress username with zero risk of losing access or content.
Method 2: Intermediate – Use a Plugin Like Easy Username Updater
If you prefer not to create and delete users, the Easy Username Updater plugin offers a quick, safe solution.
Step 1: Install the Plugin
- Go to Plugins > Add New.
- Search for Easy Username Updater.
- Click Install Now > Activate.
Step 2: Update Your Username
- Go to Users > Username Updater.
- Find your user account and click Update.
- Enter your new username and click Save Changes.
The plugin handles the update without affecting your password, content, or login session.
Once you’re done, you can safely deactivate and delete the plugin if you don’t plan to change usernames again.
Method 3: Advanced – Change Username in phpMyAdmin
If you’re comfortable working directly with databases and your hosting provider offers phpMyAdmin, this is a more direct route—but proceed with caution.
Warning:
- Backup your site and database first.
- Log out of WordPress before editing the user table to avoid session issues.
- Do not try to change passwords this way—they are hashed and not editable via plain text.
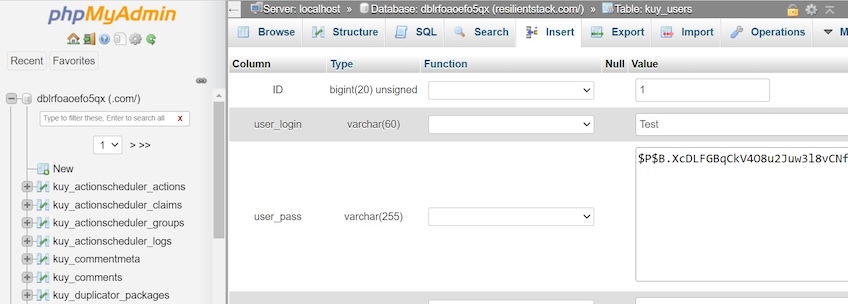
Step 1: Access phpMyAdmin
Log into your hosting control panel (like cPanel or Site Tools). Find phpMyAdmin, and select your site’s database.
Step 2: Locate the Users Table
In the sidebar, look for a table named something like wp_users or [prefix]_users.
- Click the table.
- Find your current username.
- Click Edit.
Step 3: Change the Username
- In the
user_loginfield, enter your new desired username. - Scroll down and click Go or Save.
That’s it. You can now log in using your new username.
Alternatively, advanced users can run this SQL query:
UPDATE wp_users SET user_login = 'newusername' WHERE user_login = 'oldusername';
Replace wp_users, newusername, and oldusername with your specific details.
Optional: Just Change the Display Name Instead
If your goal is simply to update how your name appears on posts, you don’t need to change your actual login.
- Go to Users > Profile.
- Scroll to the Name section.
- Enter a nickname and choose how your name should be displayed.
- Click Update Profile.
This updates the public-facing name on your blog posts and comments without altering your login credentials.
Common Mistakes to Avoid
Changing your WordPress username can be straightforward—if you avoid these pitfalls:
Using a Fake Email
Without a working email, you won’t be able to reset your password. Always use a real, accessible email address when creating or updating user accounts.
Ignoring Plugin Conflicts
Some plugins—like login with Google, SSO tools, or Jetpack—modify how logins work. Make sure those don’t override your changes.
Forgetting About WordPress.com Logins
If you created your site through WordPress.com or log in with Jetpack credentials, you’ll need to manage usernames from your WordPress.com dashboard.
Making Typos in phpMyAdmin
One wrong character in your database can break your login. If you’re editing the database manually, double-check everything.
Pro Tips for Better User Management
- Keep only one active Administrator account per person.
- Use long, secure passwords and rotate them regularly.
- Limit user roles to the minimum required permissions.
- Remove old or unused accounts to reduce attack surfaces.
Final Thoughts
Changing your WordPress username isn’t something you’ll need to do often—but when you do, it’s critical to take the right approach. Whether you go the beginner route with a new user account, use a trusted plugin, or dive into phpMyAdmin, always make a backup first.
And remember: if your only concern is how your name appears on the site, a simple display name update is all you need.