Did that title scare you?
I’m not sure what it is, but as soon as people see the word “technical,” they start to get squeamish.
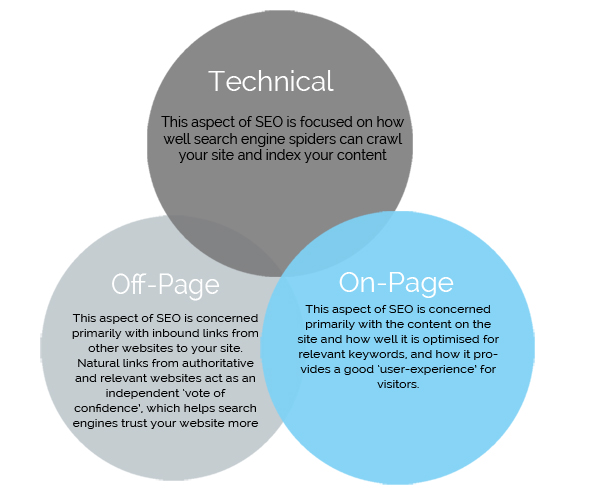
In this case, technical SEO just refers to any SEO work that is done aside from the content. Essentially, it’s laying a strong foundation to give your content the best chance it can have to rank for relevant keywords and phrases.
Just like they have for on-page SEO, technical aspects of SEO have changed as search engines have become more sophisticated.
Save and organize your technical SEO ideas in one place across all the document apps you use.
While there isn’t much you can do to “game” search engines from a technical standpoint, there are some new factors in 2015 that you need to consider if you want to improve your or your clients’ rankings.
If I were to cover this subject in depth, I would have to create another advanced guide.
Instead, I’ll go over the most important aspects of technical SEO from a beginner’s perspective as well as give you a few specific tactics and next steps to fix common problems in each area.
To get fast rankings, you need a fast site
This fact isn’t new: if your website loads slowly, a large portion of visitors will quickly leave.
What you need to know from an SEO standpoint is that a slow website can harm you in two ways.
First, site speed is one of Google’s ranking factors. First announced in 2010, it started to affect a small number of rankings at that point. We now know, the “time-to-first-byte” (TTFB) correlates highly with rankings.
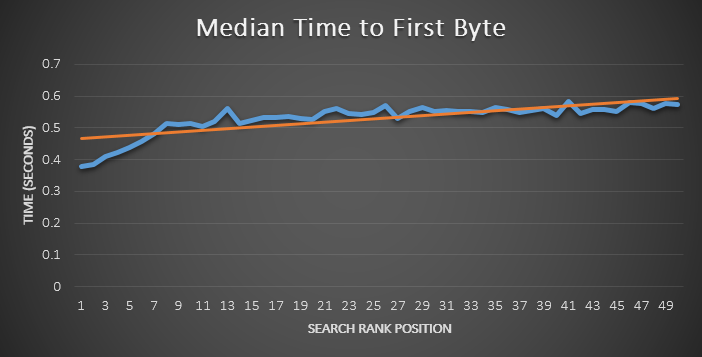
TTFB is exactly what the name suggests: the amount of time needed for a browser to load the first byte of your web page’s data.
If that was the whole story, we’d only focus on improving TTFB. But there’s more.
We also know that 40% of people will close a website if it takes longer than 3 seconds to load. Further, 47% of polled consumers expect a page to load within 2 seconds.
Google may not take total page speed into account, but users do. Even if your TTFB is good, if it takes 3-4 seconds for your full page to load, many visitors will leave without waiting.
The worst part is that they’ll click the “back” button and choose a different search result.
This is known as “pogo-sticking,” and it’s one of the most important signs that a user isn’t satisfied.
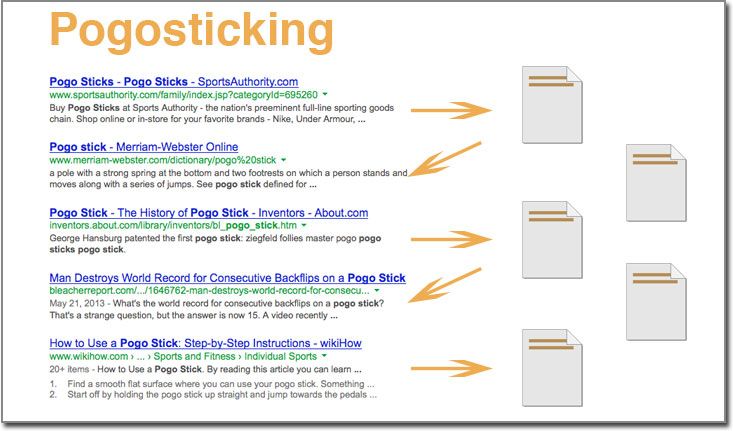
If it happens too often, your rankings will drop in favor of a competing search result that doesn’t have the same issues.
Finally, while it isn’t a strictly SEO point, consider that just a one-second delay in loading time can cause conversions to drop by 7%. Even if site speed didn’t affect search rankings, you’d still want to optimize it.
Not all site speed problems are of equal importance: While there are hundreds of factors that affect site speed, some are much more common than others.
Zoompf analyzed the top 1,000 Alexa-ranked sites for site speed and found that the following four problems were the most common (in order from most to least):
- unoptimized images
- content served without HTTP compression
- too many CSS image requests (not using sprites)
- no caching information (expires header)
Keep in mind that the sites in that analysis were some of the best on the web. They fixed many basic problems that may affect you, especially if you use WordPress:
- excessive plugin use
- not using a CDN for static files
- a slow web host
Don’t guess your site speed problems; diagnose: You very well may have one of those issues that I just listed, but first, you need to confirm them.
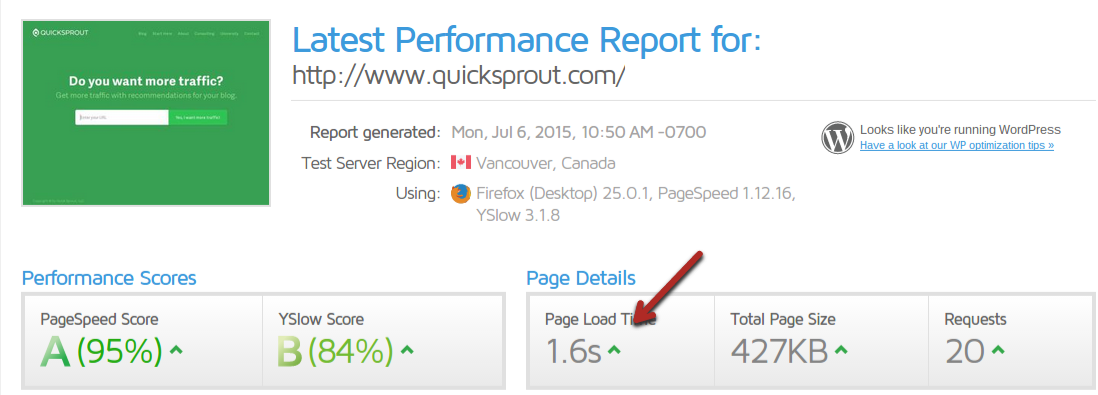
There are a lot of great tools out there, but I always recommend starting with Google’s PageSpeed Insights tool. Enter a URL, and let the tool do its thing:
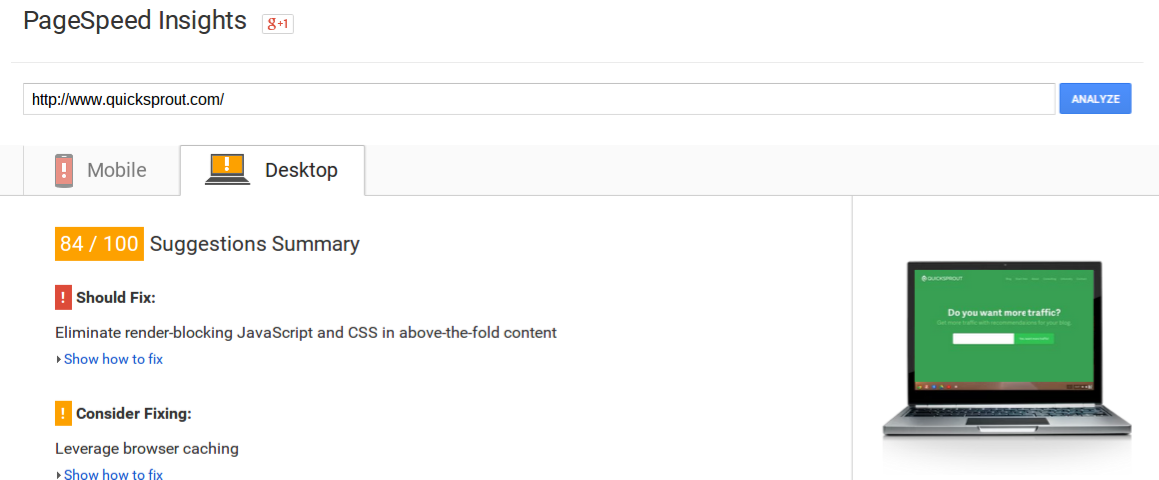
Any score above 80 is decent. That being said, higher is better, and improving Quick Sprout’s speed is on my long list of things to do.
If you’d like a second opinion, use a tool such as GTmetrix.
Notice that some tools will give you different scores. That’s because they weigh problems differently.
The following are the two most important things you need to ensure: that (1) your page loads quickly (under 2 seconds) and (2) your page is as small as possible with the least number of requests.
The Google tool is the simplest and a good place to start. It will give you the most important issues to fix (in red). Fix the orange ones if possible, but they don’t usually cause too much of a slowdown in your loading speed.
I do recommend using another tool to get more details. With GTmetrix as an example, you can click on the “waterfall” tab to see the exact amount of time each request took to fulfill.
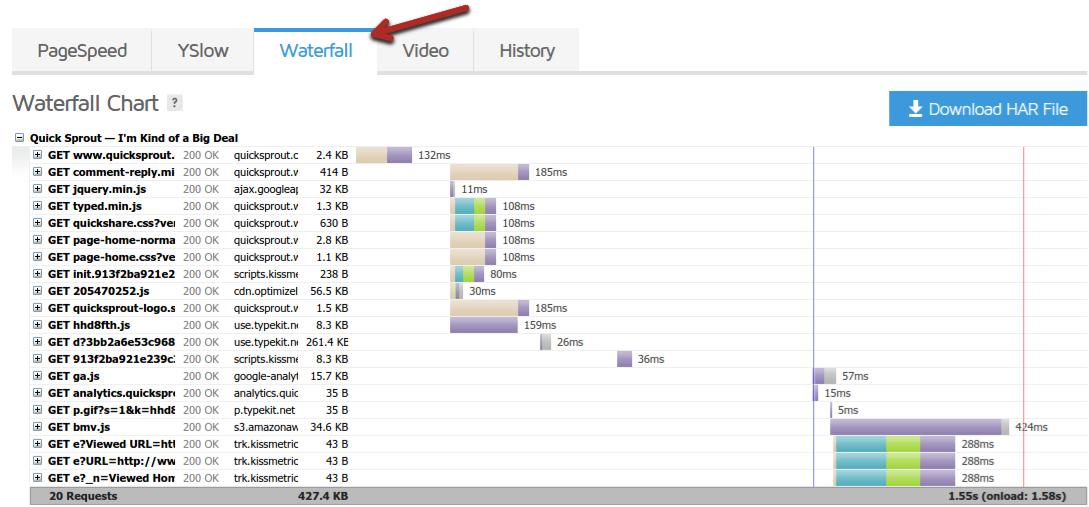
This lets you see if your hosting isn’t up to par (a lot of waiting) or if one request on your page is taking way longer than another.
Once you know what your problems are, fix them. As I said before, there’s no way I can go into everything in this guide, but I’ll show you what to do if you have some common problems.
Start with your images: If you do nothing else, compress them. Most types of images have unnecessary metadata that take up space, which can be deleted without causing any harm.
Use a tool such as Optimizilla to compress pictures beforehand, or use a plugin such as WP Smush to compress any pictures you upload to WordPress automatically.
In addition, pick your file size carefully. JPEG files are usually smaller once compressed although not as high quality as PNG files. If possible, use vector images (SVG is the most popular format), which can scale to any dimension with no loss of quality.
Next up: Combine images into sprites.
A “sprite” is simply an image file that contains many small images. Instead of having to make a separate request for each image, you only have to get the one. Then, you use CSS to tell the browser which area of that image to use.
Sprites should include often used images such as navigation icons and logos.
Here is a complete guide to CSS sprites if you’d like to do it manually.
An easier way to accomplish this is to use an online sprite creator. Here is how to use it: create a new sprite, then drag as many appropriate pictures as you can onto the canvas:
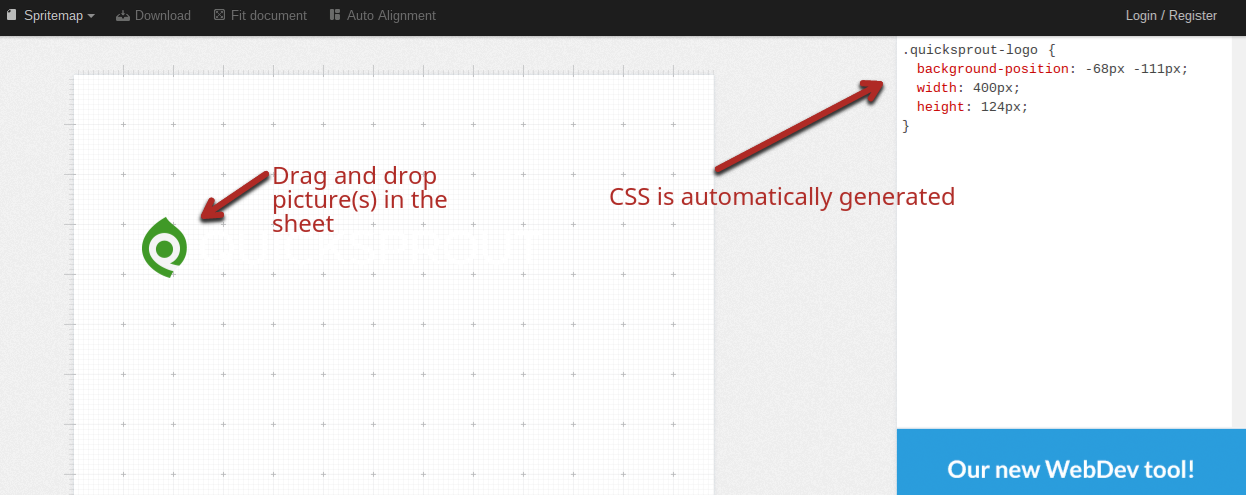
Next, download your sprite (button at the top), and upload it to your site. It’s much easier than coding it from scratch.
I’ve also collected some of the best guides to other common problems:
- Enable HTTP compression: https://zoompf.com/blog/2012/02/lose-the-wait-http-compression
- Set expires header: https://gtmetrix.com/add-expires-headers.html OR use a simple expires header plugin: https://wordpress.org/plugins/far-future-expiry-header/
- How to use W3 Total Cache for WordPress: https://www.wpbeginner.com/plugins/how-to-install-and-setup-w3-total-cache-for-beginners/
- A simple guide to speeding up WordPress: https://www.sparringmind.com/speed-up-wordpress/
- One more WordPress guide for good measure: https://www.metacdn.com/speed-up-wordpress/
You don’t have to fix 100% of the problems that tools highlight, but be careful when you ignore one. Just because one page may have a fast loading speed doesn’t mean that all your pages do.
I suggest testing at least 10 pages across your site, preferably the ones that are the longest or largest (with the most images usually).
How do mobile visitors see your site?
The biggest recent changes to technical SEO have revolved around increasing the importance of mobile friendliness.
On April 21, 2015, Google released the “mobilegeddon” update. While it was hyped up as a huge update, it only had a slightly higher impact on rankings than normal:
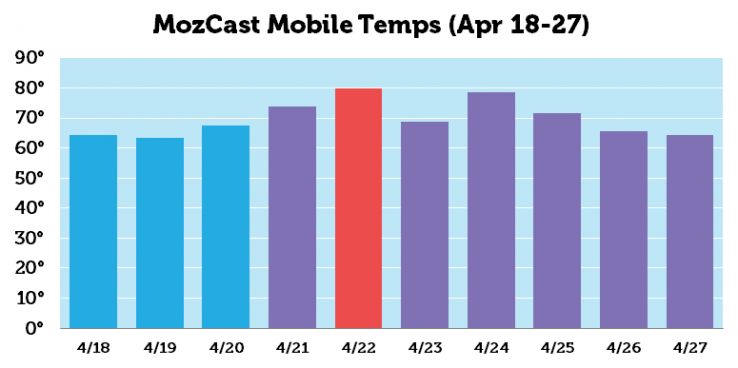
But don’t dismiss it: Google has made its opinion on the importance of mobile-friendly content very clear. And this is just the first update of more to come; think of it as a warning shot.
The good news is that even if you lose some rankings, it’s not a permanent or even long-term penalty once you fix it:
“If your site’s pages aren’t mobile-friendly, there may be a significant decrease in mobile traffic from Google Search. But have no fear, once your site becomes mobile-friendly, we will automatically re-process (i.e., crawl and index) your pages.”
Test your website’s mobile friendliness: The first and last place you need to test your site is on Google’s mobile friendly checker tool. Enter your URL, and the tool will show you exactly what Google thinks of your page:

Additionally, you can check all the pages of a verified website in Search Console (formerly Webmaster Tools) by navigating to “Search Traffic > Mobile Usability.”
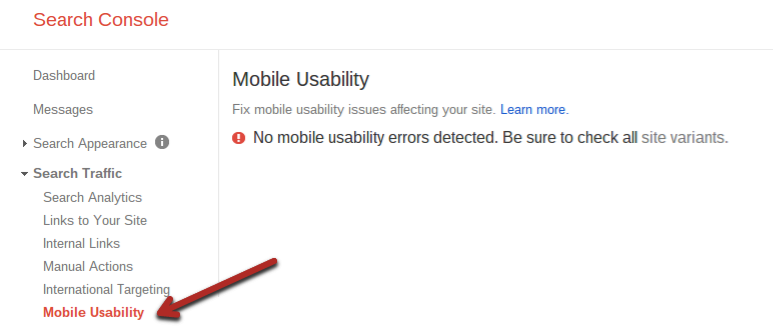
In a perfect world, you’ll have no errors either way.
However, most sites do have mobile issues. In fact, 44% of Fortune 500 company websites are not mobile-friendly.
So if your site is not currently mobile-friendly, you are not alone. But, it’s something you should fix as soon as possible.
To start with, you can choose from three different approaches to mobile-friendly design.
Approach #1 – Responsive design: This is the best option in the vast majority of cases. A responsive design shrinks and expands according to the visitor’s device.
Instead of setting widths for elements, you set a percentage.

For example, this is non-responsive CSS:
#body {
width: 600px;
}
It could be rewritten for a responsive site as:
#body {
width: 50%;
}
With this responsive code, the body section will always take up half of the visitor’s screen, regardless whether they use a phone or laptop.
Although those simple changes solve most of the problems, there is more to mobile design.
You can also use media queries so that you have different CSS values, depending on the screen size.
For example:
@media screen and (min-width: 600px) { CSS code here… }
The CSS you enter there will only be active when the screen is at least 600 pixels wide.
To learn more, read this guide on responsive design.
Approach #2 – Separate URLs for desktop and mobile visitors: This method has mostly died out in favor of responsive design.

This approach involves creating at least two different versions of each page of your website: a mobile one and a non-mobile one.
If the functionality of your website changes a lot depending on the size of the screen, this can be a good option.
But for most sites, it doesn’t make sense. Not only do you have twice as many web pages to update but you also face so many sizes of phones, tablets, and laptops that responsive design usually makes more sense.
Approach # 3 – Serve different content based on the visitor’s device: Finally, you can have a single URL for each page, but first check for a mobile user agent. If a visitor is on a mobile device, you can load a specific page, but if they aren’t, you can load the default page.

It’s similar to Approach #2 in that you’ll have to code for two different pages. The one upside is that all backlinks will point to a single URL, which will help content rank better.
Common mobile design mistakes: Making a site mobile-friendly really isn’t that hard. In most cases, it’s much easier than optimizing page load speed.
That being said, there are seven fairly common mistakes to keep an eye out for:
- Blocked JavaScript, CSS, and image files: access is controlled by your robots.txt file (more on that later).
- Unplayable content: don’t use flash videos, which aren’t playable on many mobile devices. HTML5 videos are a better option.
- Faulty redirects: don’t just redirect mobile users to your home page. Redirect them to an equivalent page they were looking for.
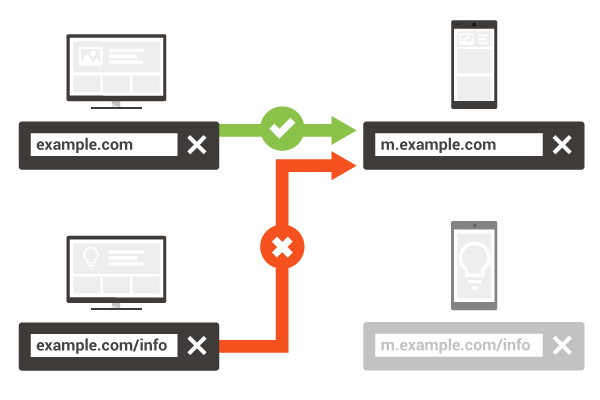
4. Mobile-only 404s: if you’re serving dynamic (separate) URLs, make sure they both work.
5. Avoid interstitials and pop-ups: Pop-ups are always a controversial subject. While they’re annoying to some on desktops/laptops, they are much more annoying and often difficult to close on mobile. If you can, don’t have anything that blocks your content on a mobile device:

6. Irrelevant cross-links: If you have a separate mobile version of your site, always link within that. Don’t make the mistake of linking to a desktop site page from the mobile site.
7. Slow mobile pages: Remember that most mobile users are on a slower connection than desktop users. This makes optimizing your load speed crucial (see above section).
A strong site architecture will get you noticed
Google sends its search spiders to almost every website on a regular basis. However, the spiders need help to discover new pages or updated pages.
Having a clear and simple site architecture will help your pages get indexed and ranked faster. This isn’t new. All the rules and best practices in 2015 are the same as they have been for years. However, this is really important, so don’t skip it just because you haven’t heard news of a new algorithm.
There are four main components to creating a site that Google loves to crawl:
Step 1 – Create HTML and XML sitemaps: It starts with a sitemap that lists URLs on your site. This is the most basic way to direct spiders.
There are two types of sitemaps: HTML and XML.
HTML sitemaps are designed for humans, but search spiders can also use them to find pages on your site. These are typically linked to in the footer of your website, so the links don’t have to be prominent.
An XML sitemap, on the other hand, is essentially a text file with one URL per link. Humans shouldn’t see this—only search spiders. If you have an especially large site, you’ll need more than one XML sitemap. A single sitemap can’t be more than 50,000 URLs of 50MB.
You can (and should) also make separate sitemaps for each type of content (video, images, articles, etc.).
While you can have both, you need at least an XML sitemap. It will serve as the starting point for most spiders.
You have a few options to create your sitemap. First, you can use the Bing plugin to generate a server side sitemap.
The most popular option is to use a WordPress plugin to automatically create and update your sitemap. You can either use a specialized plugin like Google XML sitemap or use Yoast’s all-in-one SEO plugin, which has the option to create a sitemap.
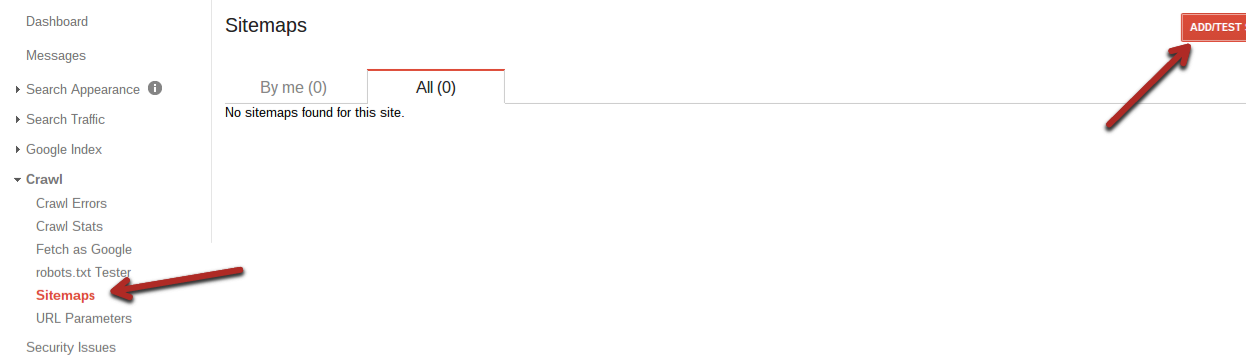
Next, submit your sitemap in both Google Search Console and Bing Webmaster Tools.
In Google Search Console, go to “Crawl > Sitemaps,” and add all your sitemaps (one at a time), using the “Add/Test Sitemap” button in the top right.
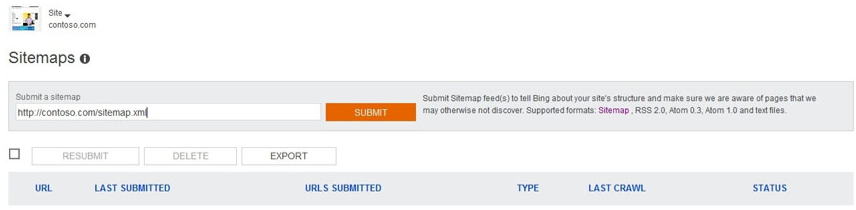
Similarly, in Bing, go to the “Sitemaps” navigation section, and enter your sitemap(s):
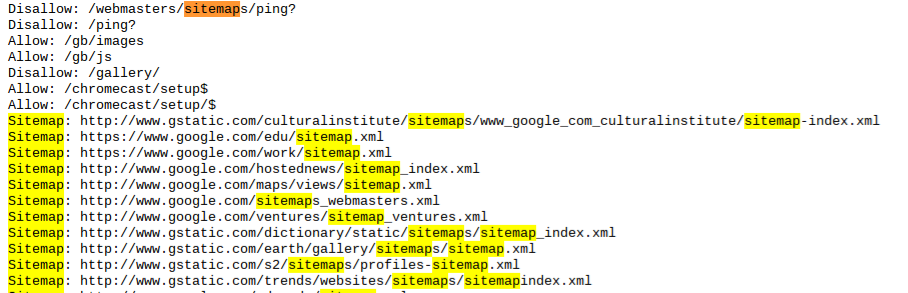
Here’s the part that most site owners forget: you also have to add sitemap locations to your robots.txt file. This tells other spiders where to check. Plus, Google would check there if for some reason it had problems with your submission.
Your robots.txt file should include a section like this, with a line for each sitemap:
User-agent: *
Sitemap: https://website.com/my-sitemap1.xml
Sitemap: https://website.com/my-sitemap2.xml
You can even look at Google’s own robots.txt to see its sitemaps:
Step 2 – Silo content as much as possible: Another major way Google uses to crawl sites is to follow internal links. In addition, this is partly how it assigns relevance to a page and website.
Siloing involves breaking up your content into different categories. For example, since the Crazy Egg blog covers conversion optimization, email marketing, etc., there are different categories for each:
- https://blog.crazyegg.com/category/conversion-optimization/
- https://blog.crazyegg.com/category/email-marketing/
- https://blog.crazyegg.com/category/blogging-for-business/
- https://blog.crazyegg.com/category/ecommerce/
Each category page links to the posts in that category. The point of this is so that Google’s spiders could land on the homepage (or any post), navigate to a category, and then visit all the most recent posts on the category page.
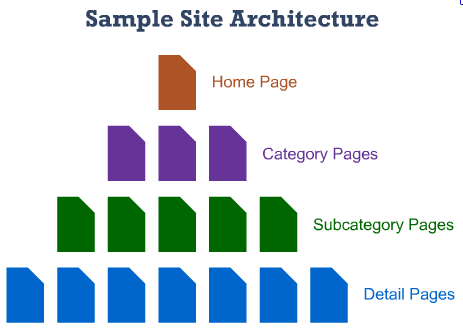
Because of this, no post is more than a few clicks away.
Of course, there’s a problem when your site gets too big or you sell too many products as you can only fit so many per page.
You still want all parts of your website to be within 3-4 clicks of each other to ensure they get crawled. The most popular option is faceted navigation, which lets you filter results:
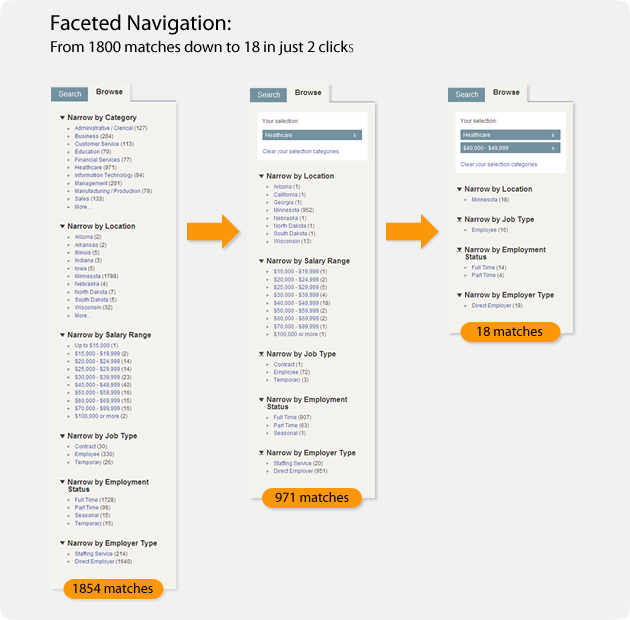
The right filters can take millions of results down to several in just a few clicks.
I also talked about one other bonus of having a simple site architecture. With a silo structure, it’s clearer to search engines what your site is about.
Instead of having a bunch of posts and pages on your website in no particular order, arrange them all in categories to make it clear to search spiders which content goes together:
One of Google’s main goals is to provide the most relevant results. The easier it can determine the topics you write about, the more search traffic you will get.
Step 3 – Get rid of crawl errors: The final part of optimizing your site for crawling is to get rid of anything that prevents Google from identifying or crawling your website.
Head over to Search Console, and navigate to “Crawl > Crawl errors”.
If you have a large site, you might see thousands of errors if you haven’t addressed them. That’s okay—you can often fix large batches at the same time. Here is a complete guide to fixing common crawl errors.
Stop confusing search engines
Redirects are necessary to keep any site up to date, but you need to do it the right way.
Use the wrong codes, and it will not only hurt your visitors but also affect your search engine rankings. I’ll explain how in a moment.
A brief overview of page redirects: There are many good reasons to redirect a page. It’s usually because there is an updated version of it or you no longer cover that exact topic but would like to preserve some “link juice.”
There are two popular types of redirects:
- 301: a permanent redirect
- 302: a temporary redirect
When you tell a search engine that a page has permanently been moved to a new URL (301), it will transfer most of the old page’s authority to the new one (90-99%).
However, if you do a 302 redirect, the search engine knows that the redirect will be gone soon and won’t transfer the authority of the original page over. If the redirect stays in place long enough, you will lose at least part of your traffic (usually).
Simple rule: If you no longer need a page, create a 301 redirect to an updated page.
The file not found page (404 error): Another common browser code is the 404 code, which means the page could not be found.
It’s important to create a custom 404 page even if it’s simple. If not, it’ll look like this to your visitors:
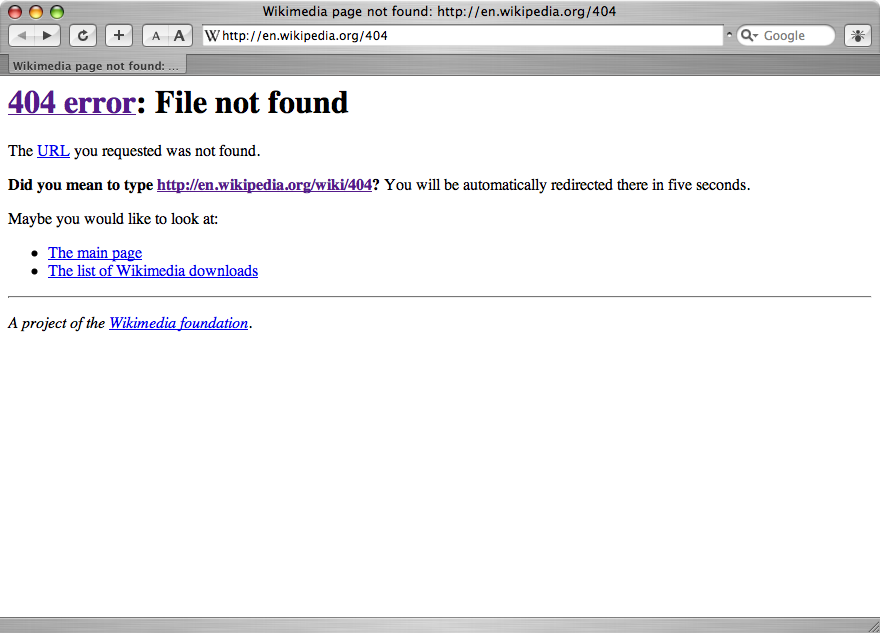
Most visitors will obviously close the page or return back to where they were.
Instead, creating a custom 404 page, like this one on Quick Sprout, can invite a lost visitor in:
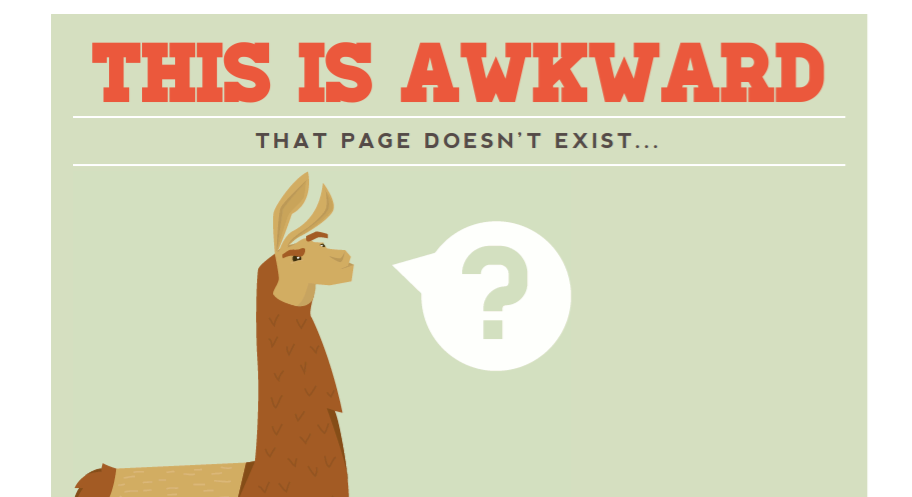
Just below that llama, there are two clear links to important parts of the site. While some visitors will still leave, many will explore, which is great.
There are a few different situations where a 404 error will come up:
- You moved a page: You should 301 redirect the old page to the new one (it’s easy to forget).
- Someone linked to an incorrect URL: Either 301 redirect that URL to the correct one (if the link is strong), or create a custom 404 page.
- You deleted a page: Redirect it if it has links pointing to it (or significant traffic) and you have another highly relevant page to redirect to. Or just have it go to your custom 404 page.
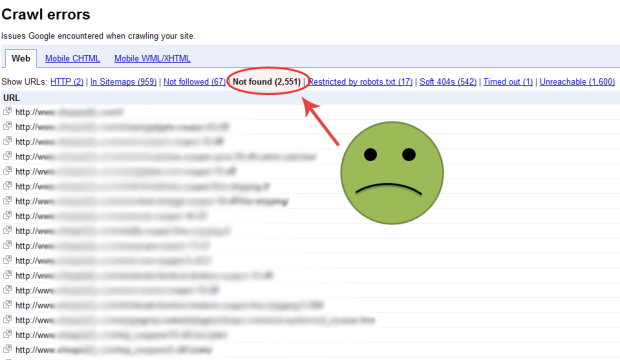
The easiest way to find 404 pages on your site is with Search Console.
Once in your Search Console, navigate to “Crawl > Crawl Errors.”
This time, we’re specifically looking for “not found” pages:
The most useful thing here is that you can click any of these individual URLs. When you do, a pop-up will appear with more details. There’s also a “linked from” tab so you can see which pages link to it (you could correct any incorrect internal links).
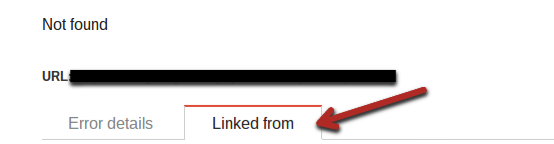
Fix the link on those pages, and then mark the problem as fixed.
Another option is to use Ahrefs to find broken links. This is probably the best tool you can use for this in order to correct off-page links (controlled by someone else).
Type in your site in the search bar, then highlight the “Inbound Links” dropdown menu, and click on “Broken Backlinks.”
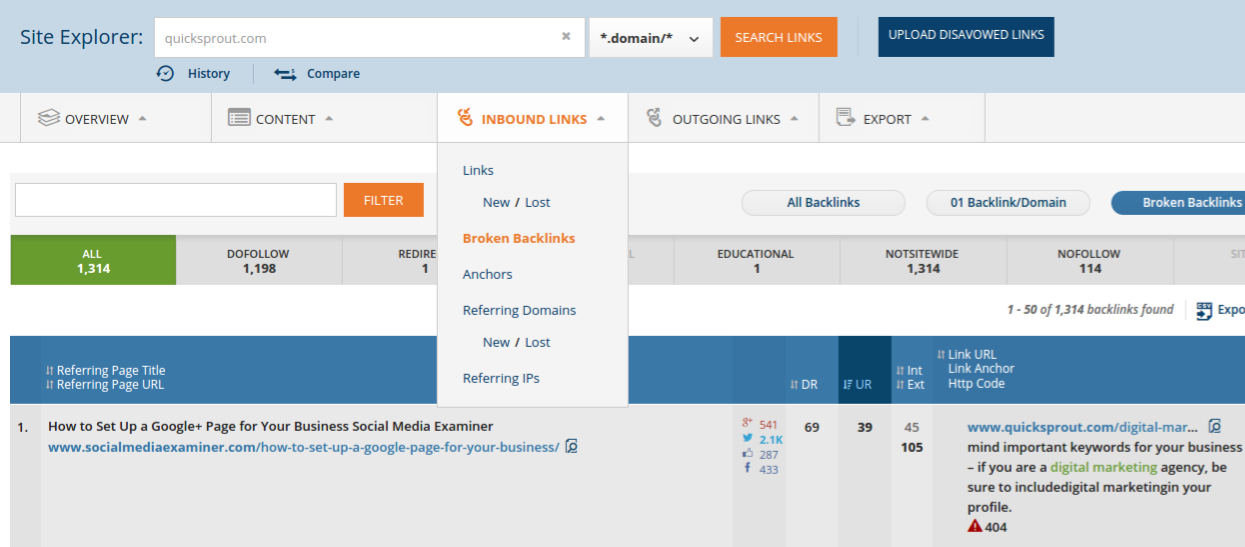
You’ll get a list of all the sites linking to your main domain, but with links that result in a 404 error. Usually this is because the other party made a typo.
If the link is strong enough, you can go to the linking page, find contact information, and give them the correct URL to replace it with.
Or, as I said earlier, you can 301 redirect the broken URL to the right one, which will preserve some link juice.
Get rid of thin or duplicate content
Pandas aren’t just adorable animals—they are also one of Google’s most famous algorithm updates.
The first Panda update was in 2011, which affected 11.8% of queries (huge). After that, there were a total of 26 more Panda updates in the following three years.
The Panda update was targeting low quality or duplicate content. Sites that had big issues were punished severely.
Curiously, there hasn’t been a Panda update since September 23, 2014 (as of July 2015). I’m not sure if we’ll ever see one again.
Why? Recently, Google released a “phantom” update. This update involved Google changing its core quality algorithm. There’s a chance that it incorporates part or all of Panda. After all, Panda was a filter that had to be run periodically. Google would rather be able to monitor quality constantly.
So that’s where we are now: Google is getting better and better at detecting duplicate content, and you will lose search traffic if you have a significant amount of it.
Duplicate content is bad for visitors, which is why search engines don’t like it. In addition, it can confuse search engines because they don’t know which page is most relevant.
Note: Even if you don’t get a penalty, you can still lose traffic.
Luckily, it’s pretty easy to take action to protect yourself against being penalized for duplicate content.
Step 1 – Find duplicate content: It’s pretty simple to find any pages with duplicate content. As is often the case, Google Search Console is the best place to start. Go to “Search appearance > HTML improvements” to see if you have any issues:
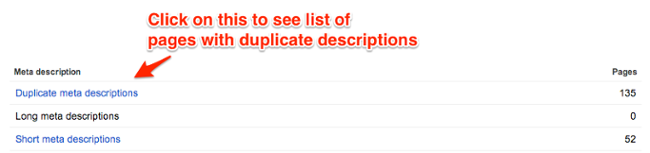
Click the number to see specific cases of duplicate content.
Alternatively, you can use a tool such as Siteliner. Enter your domain, and the tool will find any duplicate content, plus sort it by percent match:
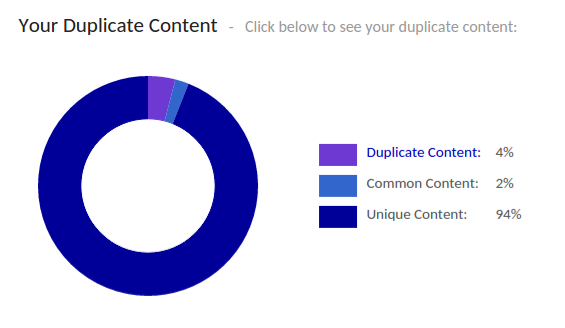
Note that the free version only covers 250 URLs, so large sites will have to either upgrade or rely on Google Search Console.
Step 2 – Get rid of duplicate content issues: There are three main ways in which you can solve your problems:
- Delete the duplicate content
- Add a canonical URL to each version
- Reduce the amount of duplicate content
The first solution is trivial—implement it if you can.
Mostly, duplicate content issues are caused by URL parameters. For example, visitors could get to the exact same page with the following URLs:
- https://www.quicksprout.com/2015/07/06/the-100000-challenge-june-update/
- https://www.quicksprout.com/2015/07/06/the-100000-challenge-june-update?source=organic/
- https://www.quicksprout.com/2015/07/06/the-100000-challenge-june-update?ref=email/
If all pages are indexed, they will be considered duplicate content. Your only option here is to include a canonical link on the page, if you haven’t already.
A canonical link tells Google that you realize there are similar pages on your site, but there is one preferred version that is the best version for readers to go to.
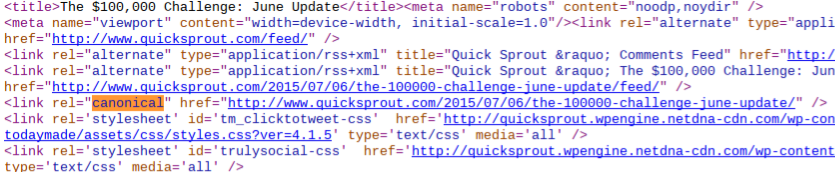
On this page, I have a canonical link to the original URL. Even if a visitor comes to the page with the parameters in their link, that same canonical will tell Google what it needs to know.
Finally, if you’re getting duplicate content errors because of your “read more” descriptions, you can reduce the number of words you show on your blog and category pages. Alternatively, write a custom description for each.
Describe your content like a pro with structured data
Modern search engines are pretty good at putting together what your page is about just by looking at the on-page content. However, you can make it even easier for them by using structured data markup.
While there are multiple libraries you can use, stick to schema.org, which is a project created by all the major search engines.
Structured data isn’t new, but it’s still heavily underutilized. Usually, it’s because an SEO hears the term and gets squeamish, just like with “technical” SEO.
It’s actually really simple, and I’ll show you how to use it for your site in this section.
What schema is – the simple version: The schema vocabulary is just a way of describing content to search engines. You can insert schema terms into your existing HTML.
While Google doesn’t use schema markup as a direct ranking factor, it can use it to help categorize a page and to create rich snippets.
Rich snippets are those things you see in certain searches, e.g., star ratings, pictures, and anything else besides the plain text:
Rich snippets can affect your search rankings. They almost always the increase click through rate, which could tell Google that your page is more important than the surrounding results, leading to more traffic and better rankings.

You can add schema terms to existing HTML code to describe a section of content. For example, the following common term—“itemscope”—tells search engines that the entire “div” section is about the same topic:
<div itemscope>
<h1>Avatar</h1>
<span>Director: James Cameron (born August 16, 1954) </span>
<span>Science fiction</span>
<a href=”../movies/avatar-theatrical-trailer.html”>Trailer</a>
</div>
But there are thousands of other terms you can use. Here’s the full list.
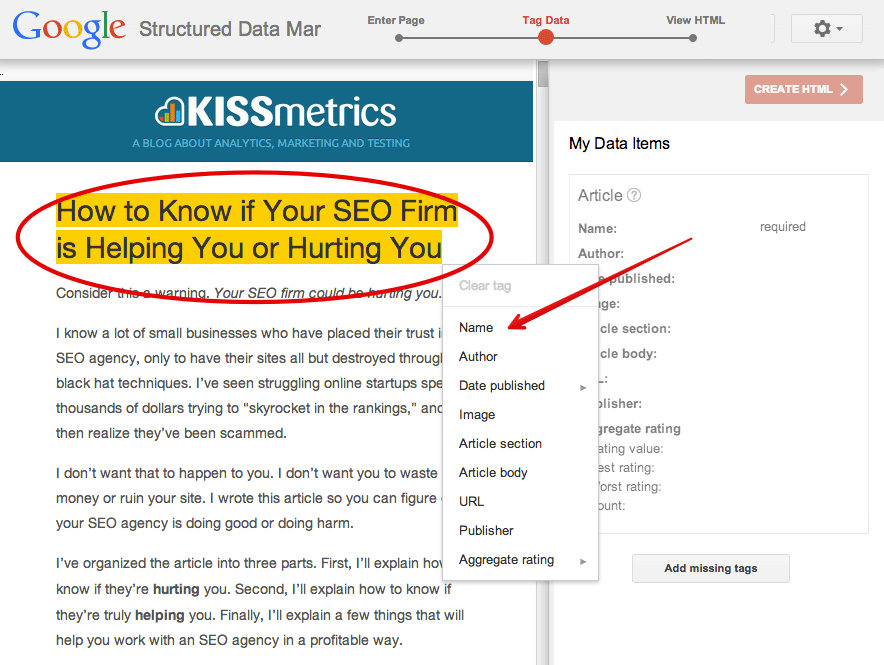
Knowing which ones you’ll use most often takes time to learn. Instead of looking through that colossal list, you can use Google’s markup helper. It takes you through the process step-by-step for the URL you enter. You simply highlight text on the page, which will automatically open a small menu, and then pick which attribute the text describes:
There are only a few steps to the process. At the end, you can view the structured data incorporated into your page’s source code with the changes highlighted:
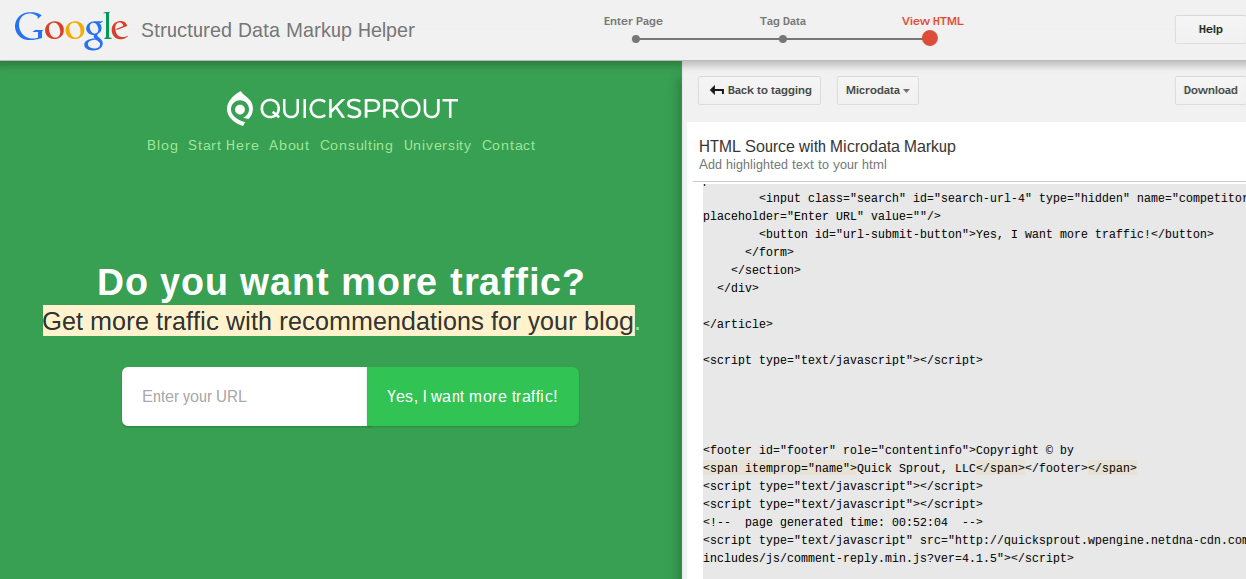
From there, you can either manually copy and paste the changes onto your page or click the download button to download the entire page code.
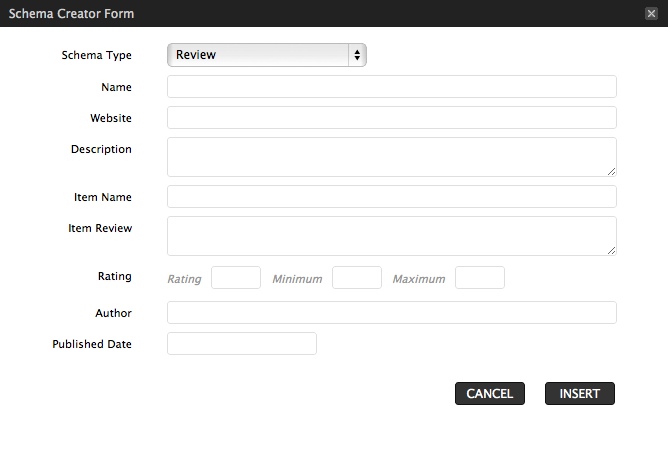
If you’re using WordPress, you could also use the Schema Creator plugin by Raven. It allows you to type in a limited number of important schema values into the WordPress page editor.
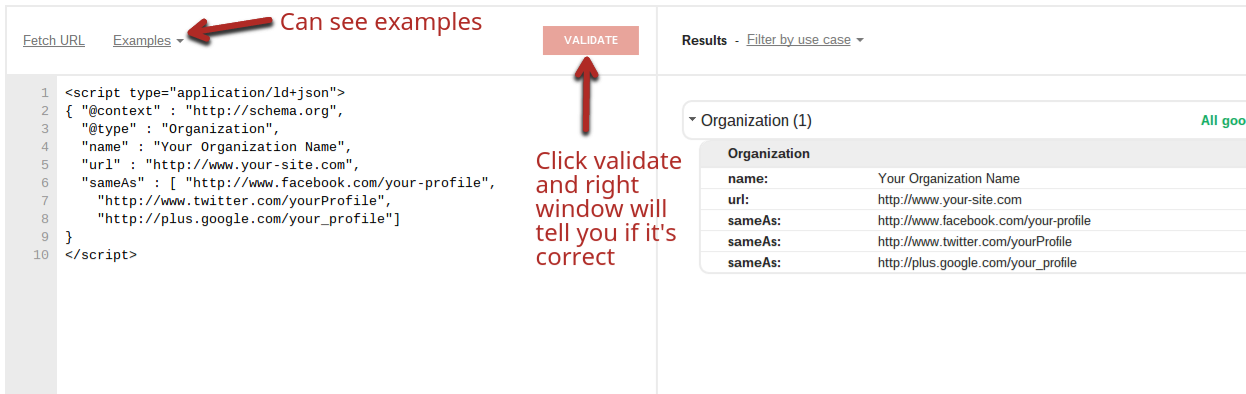
Whether or not your code is generated by Google, it’s still a good idea to test the code. Copy the entire code into the structured data testing tool, and click “validate” to see if there are any errors:
Conclusion
Ever wonder how some SEOs charge tens of thousands of dollars per month for their services?
This is why. Consider that this is just a beginner’s guide to technical SEO, and we haven’t really scratched the surface.
Expert SEOs learn as much as they can about all these individual elements and practice their skills for years to master them.
For now, you don’t need to do that. Instead, pick one or two of these technical SEO aspects. Then, see how they apply to your site, and fix any errors. Track your work and the results so you can quantify how much the mistakes hurt you.